| Delphi Clinic | C++Builder Gate | Training & Consultancy | Delphi Notes Weblog | Dr.Bob's Webshop |
| Delphi Clinic | C++Builder Gate | Training & Consultancy | Delphi Notes Weblog | Dr.Bob's Webshop |
| ||||||
The WebBroker: CGI and ISAPI
The Delphi 4 WebBroker Technology consists of a Web Server Application Wizard and Database Web Application Wizard, together with the TWebModule, TWebDispatcher, TWebRequest, TWebResponse, TPageProducer, TDataSetPageProducer, TDataSetTableProducer and TQueryTableProducer components.
The WebBroker Wizards and Components are found in the Client/Server Suite of Delphi 4, or available as separate add-on package for Delphi 4 Professional users.
Web Modules
In this chapter you'll find that the term WebBroker and Web Module is used to refer to the same thing.
Actually, the WebBroker could be seen as a part of the entire Web Module (the action dispatcher, to be precise), but for the purpose of this chapter we can assume both terms refer to the entire collection of Wizards, Components and support Classes.
The WebBroker technology allow us to build ISAPI/NSAPI, CGI or WinCGI web server applications, without having to worry about too many low-level details.
In fact, to the developer, the development of the Web Module application is virtually the same no matter what kind of web server application is being developed (we can even change from one type to another during development, as we'll see later on).
Specifically, the Web Bridge allows developers to use a single API for both Microsoft ISAPI (all versions) and Netscape NSAPI (up to version 3), so we don't have to concern ourselves with the differences between these APIs.
Moreover, Web Server applications are non-visual applications (that is, they run on the web server, but the "user interface" is represented by the client using a web browser), and yet the Web Module wizards and components offer us design support, compared to writing non-visual ObjectPascal code.
Web Server Application Wizard
First of all, the basic Web Server Application Wizard can be found in the Repository, ready to be selected after a File | New:
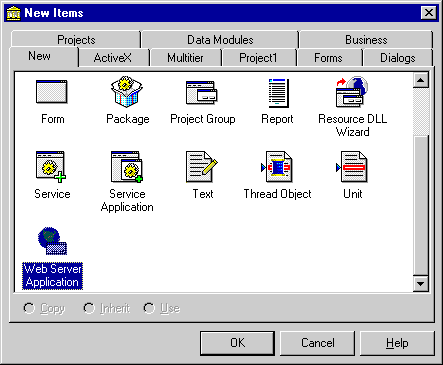
If we start the Web Server Application Wizard, we can specify what kind of Web Server application we need: ISAPI/NSAPI (the default choice), CGI or WinCGI.
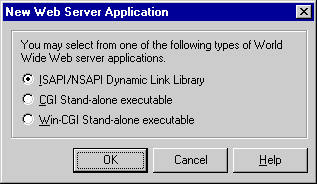
CGI
A Common Gateway Interface (CGI) Web Server application is a console application, loaded by the Web Server for each request, and unloaded directly after completing the request.
Client input is received on the standard input, and output (usually HTML) is sent back to the standard output.
The application object is of type TCGIApplication.
WinCGI
WinCGI is a Windows-specific implementation of the CGI protocol.
Instead of standard input and standard output, an .INI-file is used to send information back and forth.
The application object is again of type TCGIApplication; the only programming difference with a standard (console) CGI application is that a WinCGI application is now a "GUI" application, albeit still a non-visible one, of course.
The generated source code for a CGI or WinCGI Web Module application is almost identical.
The only difference is the fact that a CGI (console) application has the line {$APPTYPE CONSOLE} while WinCGI is {$APPTYPE GUI}.
  program Unleashed;
  {$APPTYPE CONSOLE}
  uses
    HTTPApp,
    CGIApp,
    Unit1 in 'Unit1.pas' {WebModule1: TWebModule};

  {$R *.RES}

  begin
    Application.Initialize;
    Application.CreateForm(TWebModule1, WebModule1);
    Application.Run;
  end.
Switching from standard CGI to WinCGI can be done by changing a single line in the Web Module project file.
For more information on (standard) CGI basics, check out chapter 36 of Delphi 2 Unleashed (available on the CD-ROM), or go to my website Dr.Bob's Delphi Clinic at http://www.drbob42.com.
ISAPI/NSAPI
ISAPI (Microsoft IIS) or NSAPI (Netscape) web server extension DLLs are just like WinCGI/CGI applications, with the important difference that the DLL stays loaded after the first request.
This means that subsequent requests are executed faster (no loading/unloading).
It also means the potential for concurrent connections, and hence multi-threading issues we'll encounter later on in this chapter.
The generated ISAPI/NSAPI DLL source code is very similar to the CGI source code, except for three exported APIs that are used by the Web Server to load and run the DLL as Web Server extension DLL:
  library Unleashed;
  uses
    HTTPApp,
    ISAPIApp,
    Unit1 in 'Unit1.pas' {WebModule1: TWebModule};

  {$R *.RES}

  exports
    GetExtensionVersion,
    HttpExtensionProc,
    TerminateExtension;

  begin
    Application.Initialize;
    Application.CreateForm(TWebModule1, WebModule1);
    Application.Run;
  end.
For more information on ISAPI basics, check out chapter 26 of C++Builder Unleashed (available on the CD-ROM), or go to my website Dr.Bob's Delphi Clinic at http://www.drbob42.com.
CGI vs.
ISAPI
Personally, I always start to develop an ISAPI web server extension DLL.
Even if you actually want to develop a CGI application, it's easier to start with an ISAPI DLL and change the main project file from ISAPI to CGI after you're done (compare the first two listings of this chapter).
The main disadvantages of the different approaches are the fact that CGI is slower compared to ISAPI (the CGI application needs to be loaded and unloaded for every request), while on the other hand the ISAPI DLL is less robust, as a rogue DLL could potentially crash the entire Web Server with it.
The latter is also a good reason why we should always make sure the ISAPI DLL is 100% error proof (OK, maybe we can never get to a full 100%, but at least 99%).
Especially on shared systems, where multiple domains are located on the same Web Server, it's not a good idea to let something bad happen to the Web Server.
So, it's important to test and debug our Web Server application before deployment.
Maybe even more important than our regular applications.
WebBroker Components
After we made a choice in the New Web Server Application Dialog, Delphi generates a new Web Module project and an empty Web Module.
Let's save this new ISAPI project under the name "Unleashed", as it will be the project to be used for the entire chapter.
The Web Module is the place to drop the special WebBroker Components, such as the PageProducers and TableProducers.
The WebBroker components can be found on the Internet tab of the Delphi 4 Component Palette.

From left to right: THTML (not part of WebBroker components), TWebDispatcher, TPageProducer, TDataSetPageProducer, TDataSetTableProducer and TQueryTableProducer.
The THTML ActiveX component is not part of the WebBroker components, but is used to implement the hosting application so we can test and debug Web Module applications from within the Delphi IDE itself.
Apart from those components on the Component Palette, we'll also take a closer look at the TWebModule component and the TWebRequest and TWebResponse classes.
TWebDispatcher
The TWebDispatcher component is one that we'll seldom need to drop on a Web Module.
In fact, this component is already built-in the Web Module itself, and is merely available to transform an existing Data Module into a Web Module (that is: TDataModule + TWebDispatcher = TWebModule).
TWebModule
The most important property of the Web Module is the Actions property of type TWebActionItems.
We can start the Action Editor for these TWebActionItems in a number of ways.
First, we can go to the Object Inspector and click on the ellipsis next to the (TWebActionItems) value of the Action Property.
We can also right-click on the Web Module (see figure X-04), and select the Action Editor to specify the different requests that the Web Module will respond to.
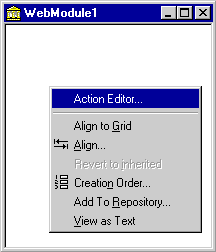
Inside the Actions Editor, we can define a number of Web Action Items. Each of these items can be distinguished from the others by the PathInfo property. The PathInfo contains extra information added to the request, before the Query fields. This means that a single Web Server Application can respond to different Web Action Items. For the examples used in this chapter, we can define nine different TWebActionItems, who will be used to illustrate the different usage and abilities of the Web Module components.
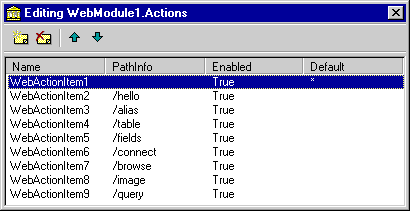
Note that the first item has no PathInfo specified, and is the (only) default Web Action Item.
This means that it's both the TWebActionItem that will be selected when no PathInfo is given, or when no other PathInfo matches the given PathInfo (i.e.
when the default action is needed).
This is the TWebActionItem that will mostly be used to "demo" a certain effect.
The other eight PathInfo values are "/hello", "/alias", "/table", "/fields", "/connect", "/browse", "/image" and "/query", and will be used for the bigger examples throughout the entire chapter.
In order to write an event handler for a specific TWebActionItem, we need to select the WebActionItem1 in the Actions Editor (see figure X-05), go to the Events tab of the Object Inspector, and double-click on the OnAction event.
This will take us to the code editor where we'll see the following code waiting for us:
  procedure TWebModule1.WebModule1WebActionItem1Action(Sender: TObject;
    Request: TWebRequest; Response: TWebResponse; var Handled: Boolean);
  begin

  end;
Before we can write any event handling code here, we must first learn the details of the parameters.
Specifically, the Request and Response parameters that are of crucial importance here.
TWebResponse
The OnAction event has four arguments: Sender, Request, Response and Handled.
The Sender is the TWebActionItem itself.
Response is of type TWebResponse which has a number of properties to specify the generated output.
The most important property is Content, a String in which we can put any HTML code that should be returned to the client.
The following code will show the simple line "Hello, world!" inside the browser:
  procedure TWebModule1.WebModule1WebActionItem1Action(Sender: TObject;
    Request: TWebRequest; Response: TWebResponse; var Handled: Boolean);
  begin
    Response.Content := '<H1>Hello, world!</H1>'
  end;
Of course, we can assign anything to the Response.Content property.
Usually, it will be of type "text/html", which is the default value of the Response.ContentType property as well.
In case we want to return anything else, we need to set the Response.ContentType to the correct value.
Binary output (such as images) cannot be returned directly using the Response.Content, in which case we must use the Response.ContentStream property instead.
We'll get back to this when we actually are going to stream out images.
TWebRequest
The Request parameter of type TWebRequest contains a number of useful properties and methods that hold the input query.
Based on the used method to send the query (GET or POST), the query can be found in the QueryFields or the ContentFields.
In code, we can determine this as follows, and return the request back to the requester again:
  procedure TWebModule1.WebModule1WebActionItem1Action(Sender: TObject;
    Request: TWebRequest; Response: TWebResponse; var Handled: Boolean);
  begin
    Response.Content := '<H1>Hello, world!</H1>';
    if Request.Method = 'GET' then
      Response.Content := Response.Content + '<B>GET</B>' +
        '<BR>Query: ' + Request.Query
    else
      if Request.Method = 'POST' then
        Response.Content := Response.Content + '<B>POST</B>' +
          '<BR>Content: ' + Request.Content
  end;
GET vs. POST
There are a number of differences between the GET and the POST protocol that are important to know.
When using the GET protocol, the query fields are passed on the URL.
This is fast, but limits the amount of data that can be sent through.
Depending on your client and server machine this is a few KBytes at most, but that's enough for most cases.
A less visible way to pass data is by using the POST protocol, where content fields are passed using standard input/output techniques (or a Windows .INI file for WinCGI).
This is slower, but limited only to the amount of free diskspace.
Besides, since you cannot see the data being sent on the URL itself, there's also no way of (accidently) tampering with it and getting incorrect results.
Usually, I prefer to use the POST protocol (clean URLs, no limit on the amount of data, but slightly slower), and only use the GET protocol when I have a good reason to, as we'll see in the remainder of this chapter.
IntraBob
Now it's time to test the first version of the Web Module application.
But since it's a DLL, we cannot just press the run button.
In fact, we actually need a Web Server to test the Web Module application.
This means we should deploy the application to our remote Web Server, or test it with a Personal Web Server first.
Chapter 28 of the Borland Delphi 4 Developer's Guide contains clear instructions on how to setup your (Personal) Web Server in order to be able to test and debug ISAPI DLLs or CGI applications.
However, for simple cases, we can also get a helping hand from IntraBob, my personal ISAPI Debugger "host" that replaces the (Personal) Web Server.
Just put a copy of IntraBob.exe (available on the CD-ROM or from my website) in the same directory as our ISAPI project source code, and enter the location of IntraBob as "Host Application" in the Run | Run Parameters dialog:
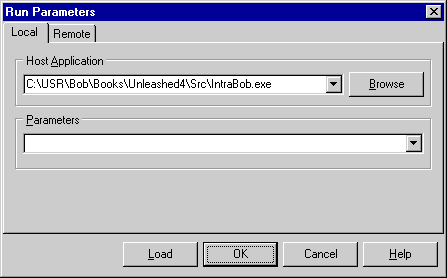
When we execute the ISAPI DLL, the host application IntraBob (or your Web Server) is executed instead.
And the best thing is that we now use the Delphi integrated debugger to set breakpoints in the source code.
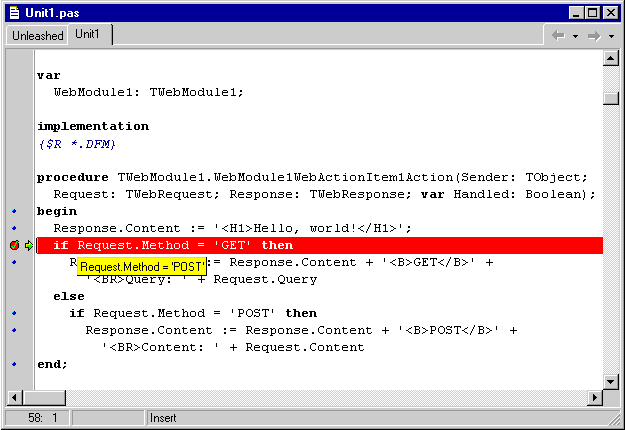
For example, set a breakpoint at the first line that checks the Request.Method and we'll see that the Delphi IDE will break here as soon as we run the Web Module application.
In order to actually start the ISAPI DLL, we need to write a small local webpage containing an HTML Form that will load the Web Module application.
Supposing we uploaded the ISAPI DLL called "Unleashed.dll" to the "cgi-bin" directory on my web server at domain www.drbob42.com, we need an Action with value "http://www.drbob42.com/cgi-bin/Unleashed.dll", which can be seen in the following HTML Form code:
  <HTML>
  <BODY>
  <H1>WebBroker HTML Form</H1><HR>
  <FORM ACTION="http://www.drbob42.com/cgi-bin/Unleashed.dll" METHOD=POST>
  Name: <INPUT TYPE=EDIT NAME=Name><P>
  <INPUT TYPE=SUBMIT>
  </FORM>
  </BODY>
  </HTML>
When we load this webpage in IntraBob, we'll see the WebBroker HTML Form webpage. We are now ready to click on the Submit button to load and start our first Web Module application:
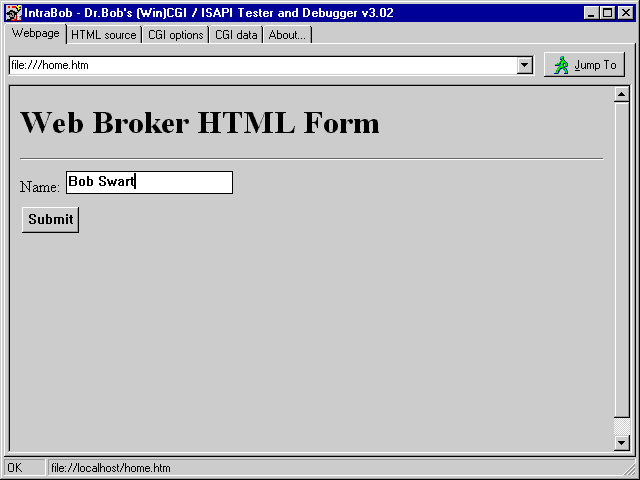
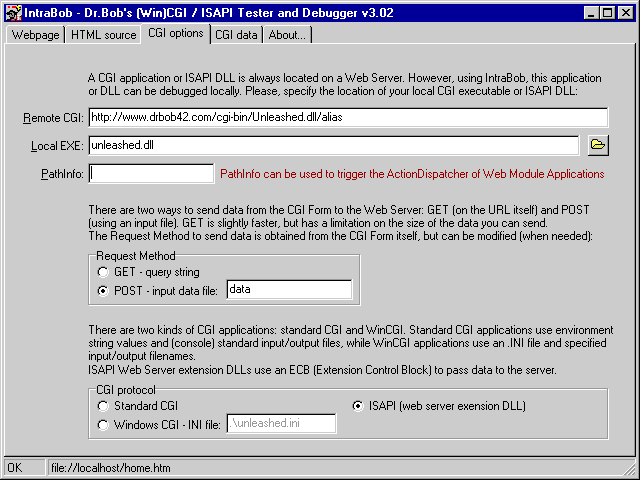
IntraBob parses the HTML Form, and automatically fills in the CGI Options tab with the value of the remote CGI (or ISAPI) application, the name of the local executable (or DLL) and the PathInfo, if specified. We can also go to this tab and set some of these options manually (this is an easy way to change the value of PathInfo and fire another WebActionItem):
Remember the breakpoint we set on the first line that checked the Request.Method value? Well, as soon as we click on the Submit button, the default WebActionItem will be fired, meaning this breakpoint will be triggered, and we end up in the Delphi Integrated Debugger. Here, we can use Tooltip Expression Evaluation to check the value of Request.Method directly:
If we press F9 again, we see the final result in IntraBob:
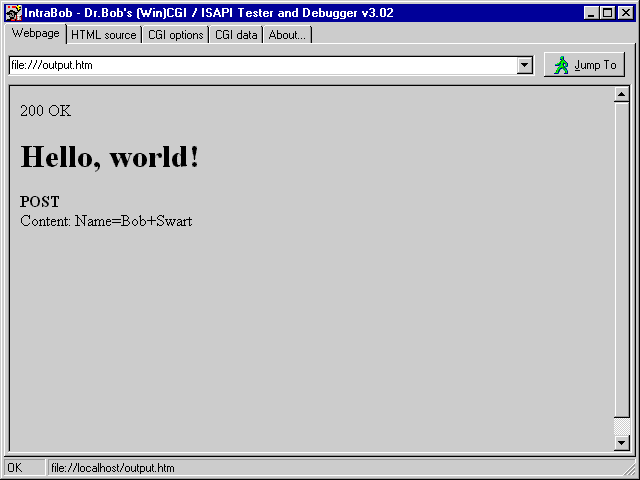
Viola, a HTML Form "debugger".
One that will return what (we think) we've specified as input fields.
This can be quite helpful when a certain WebActionItem doesn't seem to work, and we need to check if it received the input request in good order.
Note that spaces are replaced by "+" plus signs, and generally you'll find special characters to be replaced by a "%" followed by the hexadecimal value of the character itself.
Another way to see the (not encoded) CGI Data is by looking at the "CGI data" tab of IntraBob, which will show the type of application (CGI, WinCGI or ISAPI), the environment variables, and other CGI variables with their values, including the request itself passed on standard input.
TPageProducer
We can put anything in the Response.Content string variable, even whole webpages.
Sometimes we might want to return HTML strings based on a template, where only certain fields need to be filled in (with a name and a date, or specific fields from a record in a table, for example).
In those cases, we should drop a TPageProducer on the Web Module, and use the added functionality of that component instead.
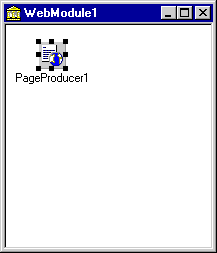
A TPageProducer has two properties to specify a predefined content.
HTMLFile points to an external HTML file.
This is useful if we want to be able to change our webpage template without having to recompile our entire application itself.
The HTMLDoc property, on the other hand, is of type TStrings and contains the HTML text (i.e.
this will be hardcoded in the DFM file).
The predefined content of a TPageProducer component can contain any HTML code as well as special #-tags.
These #-tags are "invalid" HTML tags, so they will be ignored by browsers, except for the OnHTMLTag event of the TPageProducer itself.
Inside this event, we can change an encountered TagString and replace it with a ReplaceText.
For more flexibility, #-tags can also contain parameters, right after the name itself (like a parameter Format=YY/MM/DD to specify the foramt in which to print the date).
As an example, let's fill the HTMLDoc property with the following content:
  <H1>TPageProducer</H1>
  <HR>
  <#Greeting> <#Name>,
  <P>
  It's now <#Time> and we're playing with the PageProducers...
We can see three #-tags that will fire the OnHTMLTag event of the TPageProducer component. In order to replace each of them with a sensible text, we can write the following code for this OnHTMLTag event:
  procedure TWebModule1.PageProducer1HTMLTag(Sender: TObject; Tag: TTag;
    const TagString: String; TagParams: TStrings; var ReplaceText: String);
  begin
    if TagString = 'Name' then
      ReplaceText := 'Bob' // hardcoded name...
    else
    if TagString = 'Time' then
      ReplaceString := DateTimeToStr(Now)
    else { TagString = 'Greeting' }
      if Time < 0.5 then
        ReplaceText := 'Good Morning'
      else
        if Time > 0.7 then
          ReplaceText := 'Good Evening'
        else
          ReplaceText := 'Good Afternoon'
  end;
Using a ReplaceText with a fixed value of 'Bob' feels a bit awkward, especially since the HTML Form specifically asks the user to enter a name.
Can't we just use that value here instead (by using the QueryFields or the ContentFields).
Well, we'd love to, of course, but we're inside the OnHTMLTag event of the TPageProducer component, and not in the OnAction event where we can access the Request object.
Fortunately, we can access the Request property of the TWebModule itself, which is always assigned to the Request property of the current Action.
The same holds for the Response property, by the way.
  procedure TWebModule1.PageProducer1HTMLTag(Sender: TObject; Tag: TTag;
    const TagString: String; TagParams: TStrings; var ReplaceText: String);
  begin
    if TagString = 'Name' then
    begin
      if Request.Method = 'POST' then
        ReplaceText := Request.ContentFields.Values['Name']
      else // GET
        ReplaceText := Request.QueryFields.Values['Name']
    end
    else
    if TagString = 'Time' then
      ReplaceString := DateTimeToStr(Now)
    else { TagString = 'Greeting' }
      if Time < 0.5 then
        ReplaceText := 'Good Morning'
      else
        if Time > 0.7 then
          ReplaceText := 'Good Evening'
        else
          ReplaceText := 'Good Afternoon'
  end;
This will be the last time that we check the Request.Method field, by the way.
From now on we're assuming a POST at all times (but you can still support GET as well as POST using the technique outlined previously).
  procedure TWebModule1.WebModule1WebActionItem2Action(Sender: TObject;
    Request: TWebRequest; Response: TWebResponse; var Handled: Boolean);
  begin
    Response.Content := PageProducer1.Content
  end;
In order to activate this specific WebActionItem, we need to be sure to pass the "/hello" PathInfo to the Web Module, either by including the PathInfo string in the ACTION value, or by specifying it in the PathInfo editbox of IntraBob (see figure X-08).
  <HTML>
  <BODY>
  <H1>WebBroker HTML Form</H1>
  <HR>
  <FORM ACTION="http://www.drbob42.com/cgi-bin/Unleashed.dll/hello" METHOD=POST>
  Name: <INPUT TYPE=EDIT NAME=Name>
  <P>
  <INPUT TYPE=SUBMIT>
  </FORM>
  </BODY>
  </HTML>
If we load the above HTML Form in IntraBob, and click on the Submit button, we 'll get the following output:
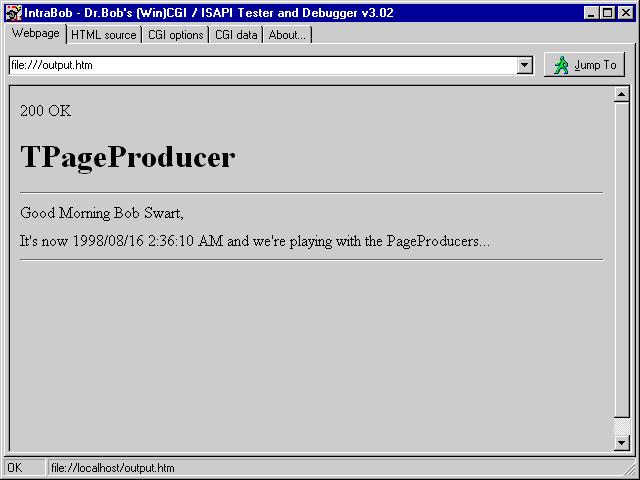
Actually, instead of "Good Morning", the example could better have stated "Good Night" in this case (assuming we would never "get up" before 3 AM), by changing the first Time-test as follows:
    else { TagString = 'Greeting' }
      if Time < 0.125 then
        ReplaceText := 'Good Night'
      else
        if Time < 0.5 then
          ReplaceText := 'Good Morning'
        else
          if Time > 0.7 then
            ReplaceText := 'Good Evening'
          else
            ReplaceText := 'Good Afternoon'
  end;
TDataSetPageProducer
The TDataSetPageProducer component is derived from the TPageProducer we saw in the previous section.
Instead of just replacing #-tags with a regular value, the TDataSetPageProducer has a new DataSet property, and will try to match the name of the #-tag with a fieldname inside the DataSet property, and (if found) will replace the #-tag with the current value of the field.
To illustrate the use of this component, drop a TDataSetPageProducer and a TTable component on the Web Module.
Rename the TTable component to "Master", assign the DatabaseName to DBDEMOS, the TableName to BIOLIFE.DB, and set the Active property of the Master table to True (so we don't have to open the table ourselves).
Next, connect the DataSet property of the TDataSetPageProducer component to the Master table, and put the following lines in the HTMLDoc property:
  <H1>BIOLIFE Info</H1>
  <HR>
  <BR><B>Category:</B> <#Category>
  <BR><B>Common_Name:</B> <#Common_Name>
  <BR><B>Species Name:</B> <#Species Name>
  <BR><B>Notes:</B> <#Notes>
These special HTML #-tag codes indicate that we only want to see four specific fields from the BIOLIFE table. The TDataSetPageProducer will automatically replace the #-tags with the actual value of these fields inside the table, so the only code we need to write is for the TWebActionItem event handler. Let's use the default TWebActionItem again, without a specific PathInfo, for this example. Start the Actions Editor, click on the first ActionItem, go to the events tab of the Object Inspector, and double click on the OnAction event to write the following code (you can remove the existing code from the previous example):
  procedure TWebModule1.WebModule1WebActionItem1Action(Sender: TObject;
    Request: TWebRequest; Response: TWebResponse; var Handled: Boolean);
  begin
    Response.Content := DataSetPageProducer1.Content
  end;
We only need to change the ACTION= value of the HTML Form back to start the default TWebActionItem again as follows:
<FORM ACTION="http://www.drbob42.com/cgi-bin/Unleashed.dll" METHOD=POST>The result from running the Web Module with this request is as follows:
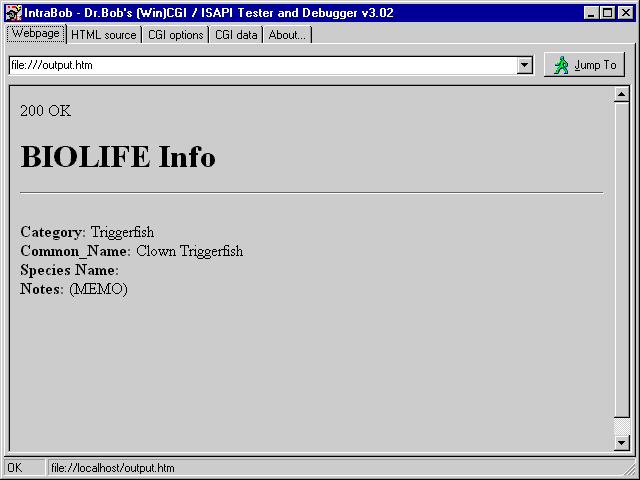
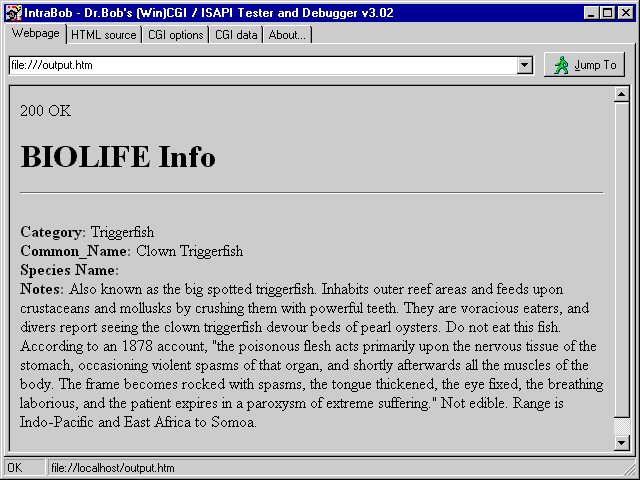
There are two things here that strike me as being not correct.
First of all, we don't get the value of the Species Name field, and second, it annoys me a bit to see that we see a "(MEMO)" text instead of the actual contents of this Notes field.
The former can be explained by the fact that the "Species Name" field contains a space, and spaces are used as terminators for the #-tag names, so the TDataSetPageProducer would have been looking for a field named "Species" here instead of the field "Species Name".
We'll take a look at some possible workarounds for this problem.
Let's first tackle the (MEMO) problem, by making use of the fact that the TDataSetPageProducer is still derived from the TPageProducer, so for every #-tag the OnHTMLTag event is still fired.
Inside this event handler, we can simply check the value of the ReplaceText argument to see if it has been set to '(MEMO)', in which case we should be prepared to change it again to the full contents.
This can be done by using the AsString method of the TMemoField, which returns the full contents we want:
  procedure TWebModule1.DataSetPageProducer1HTMLTag(Sender: TObject; Tag: TTag;
    const TagString: String; TagParams: TStrings; var ReplaceText: String);
  begin
    if ReplaceText = '(MEMO)' then
      ReplaceText := Master.FieldByName(TagString).AsString
  end;
Running again gives us a more satisfying result already:
Now, all we need is a way to use the TDataSetPageProducer to find the values of fields with spaces in their name as well.
This can be done with the same trick: after the TDataSetPageProducer has a go at replacing the #-tags to the field values, the inherited OnHTMLTag event is called, where we can check to see if a certain ReplaceText is still empty.
Now, since we must actually supply the real fieldname, but cannot use spaces in the #-tag name or its parameters, we must encode the string in a way that we can decode it again to obtain the true fieldname.
And the encoded string can only consists of letters, digits and the underscore character.
The encoding routine is simple: anything that's not a letter or digit gets encoded by an underscore followed by the hex value of the character that's encoded.
Like the HTTP % encoding.
In fact, when replacing the underscores with percents, we can use the standard HTTPDecode function to get the real fieldname back again.
The functions FieldNameEncode and FieldNameDecode are implemented as follows (we must use FieldNameEncode to encode fieldnames that have any characters inside that are not letters of digits, and we must use FieldNameDecode to obtain the real fieldname again):
  function FieldNameEncode(const FieldName: String): String;
  var
    i: Integer;

    function Hex(B: Byte): String;
    const
      HexChar: PChar = '0123456789ABCDEF';
    begin
      Hex := '_00';
      Hex[2] := HexChar[B SHR $04];
      Hex[3] := HexChar[B AND $0F]
    end;

  begin
    Result := '';
    for i:=1 to Length(FieldName) do
      if FieldName[i] in ['A'..'Z','a'..'z','0'..'9'] then
        Result := Result + FieldName[i]
      else
        Result := Result + Hex(Ord(FieldName[i]))
  end {FieldNameEncode};

  function FieldNameDecode(const FieldName: String): String;
  var
    i: Integer;
  begin
    Result := FieldName;
    for i:=1 to Length(Result) do
      if Result[i] = '_' then Result[i] := '%';
    Result := HTTPDecode(Result)
  end {FieldNameDecode};
FieldNameEncoding the field "Species Name" yields the following HTML code, which we should use in the original HTML file to get the field value:
<BR><B>Species Name:</B> <#Species_20Name>This HTML snippet will fail to find the correct field when used by the TDataSetPageProducer component. However, in our OnHTMLTag event, we can use FieldNameDecode to determine the real fieldname, and use it as follows:
  procedure TWebModule1.DataSetPageProducer1HTMLTag(Sender: TObject; Tag: TTag;
    const TagString: String; TagParams: TStrings; var ReplaceText: String);
  begin
    if ReplaceText = '(MEMO)' then
      ReplaceText := Master.FieldByName(TagString).AsString
    else
      if ReplaceText = '' then
      try
        ReplaceText := Master.FieldByName(FieldNameDecode(TagString)).AsString
      except
        on E: Exception do
          ReplaceText := '(' + E.ClassName + ': ' + E.Message + ')'
      end
  end;
Note that the try-except clause here makes sure we get to see the BDE error-message instead of an exception being raised on the Web Server, terminating the current request.
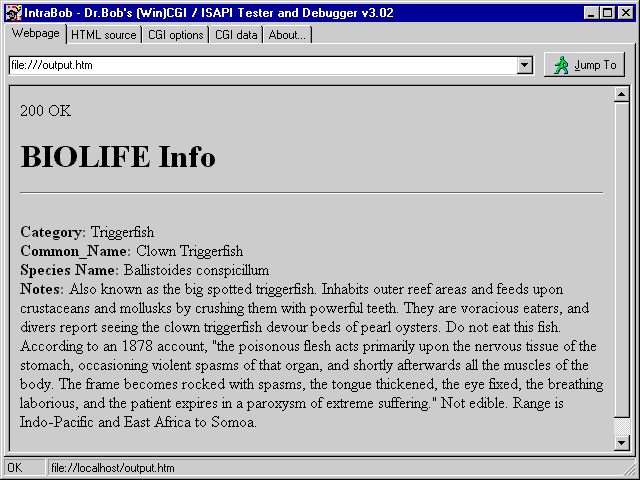
Using the above changes in HTML and source code, the final result is finally as we'd like it to see:
A final extension to the OnHTMLTag event can be made to resolve image fields that normally produce the string '(GRAPHIC)' only, such as the Graphic field of the BIOLIFE table. The idea is simple: replace the '(GRAPHIC)' string with an image, where the source is another call to the Web Module application (but this time to the special "/image" WebActionItem that only exists to produce a binary image as output). The generated HTML source for the image should look as follows:
<IMG SRC="http://www.drbob42.com/cgi-bin/Unleashed.dll/image?RecNo=42>Where RecNo is the current record number for which we need to produce the binary image (in either GIF or JPG format, of course).
  procedure TWebModule1.DataSetPageProducer1HTMLTag(Sender: TObject; Tag: TTag;
    const TagString: String; TagParams: TStrings; var ReplaceText: String);
  begin
    if ReplaceText = '(MEMO)' then
      ReplaceText := Master.FieldByName(TagString).AsString
    else
      if ReplaceText = '(GRAPHIC)' then
        ReplaceText :=
          '<IMG SRC="Unleashed.dll/image?RecNo=' +
            IntToStr(Master.RecNo) + '" ALT="RecNo=' +
            IntToStr(Master.RecNo) + '">'
      else
        if ReplaceText = '' then
        try
          ReplaceText := Master.FieldByName(FieldNameDecode(TagString)).AsString
        except
          on E: Exception do
            ReplaceText := '(' + E.ClassName + ': ' + E.Message + ')'
        end
  end;
The "/image" WebActionItem needs to assign the TGraphicField from the BIOLIFE table to the Response.
Note that this is the example where we cannot use the Response.Content property, but we should use the Response.ContentStream property (to send the binary image) instead.
This also means we need to set the Response.ContentType property, by the way:
  procedure TWebModule1.WebModule1WebActionItem8Action(Sender: TObject;
    Request: TWebRequest; Response: TWebResponse; var Handled: Boolean);
  var
    RecNo: Integer;
    ImageStream: TmemoryStream;
  begin
    RecNo := StrToInt(Request.QueryFields.Values['RecNo']);
    Master.MoveBy(RecNo - Master.RecNo); // go to right record
    ImageStream := TMemoryStream.Create;
    with TGraphicField.Create(Master) do
    try
      FieldName := 'Graphic';
      SaveToStream(ImageStream)
    finally
      Free
    end;
    ImageStream.Position := 0; // reset ImageStream
    Response.ContentType := 'image/jpg';
    Response.ContentStream := ImageStream;
    Response.SendResponse
  end;
Note that this code will not show the correct image in the browser, since the image format in the BIOLIFE table is not a JPEG file.
For our own tables, however, we can just make sure the graphic fields are already stored in JPEG format, so we don't have to convert them to a JPEG file format ourselves.
Browsing State
Seeing a single record from a table in a web browser is fine, but of course we'd like to see the next record as well, and the next, and the last, and back to the first again.
In short, we need the ability to browse through the records in the table.
Using the TDataSetPageProducer and code we've written so far, but extending it just a little bit to support browsing.
The main problem we have to solve when it comes to moving from one record to another in a web browser is maintaining state information; which record(number) are we currently looking at? HTTP itself is a stateless protocol, so we must find a way ourselves to store the information.
Saving state information can be done in three different ways: using Fat URLs, Cookies or Hidden Fields.
Fat URLs
A common way to retain state information is by adding Form variables with their value to the URL itself.
Adding the RecNo property of the Master table, for example, this could lead to the following ACTION URL:
<FORM ACTION="http://www.drbob42.com/cgi-bin/Unleashed.dll?RecNo=1" METHOD=POST>Note that the general METHOD to send Form variables is still POST, although the state (RecNo) variable is passed using the GET protocol. This means we'll see the RecNo and its value appear on the URL: something that can be experienced with some search engines on the web as well.
Cookies
Cookies are sent by the server to the browser.
When using cookies, the initiative is with the web server, but the client has the ability to deny or disable a cookie.
Sometimes, servers even send cookies when you don't ask for them, which can be a reason why some people don't like cookies (like me, for example).
Cookies can be set as part of the Response, using the SetCookieField method.
Like CGI values, a cookie is of the form "NAME=VALUE", so we can put a "KEY=value" in their without much trouble:
  var
    Cookies: TStringList;
  begin
    Cookies := TStringList.Create;
    Cookies.Add('RecNo='+IntToStr(Master.RecNo));
    Response.SetCookieField(Cookies,'','',Now+1,False);
    Cookies.Free
Note that we're using a TStringList to set up a list of Cookie values.
Each list of cookies can have a Domain and Path associated with it, to indicate which URL the cookie should be sent to.
You can leave these blank, of course.
The fourth parameter specifies the expiration date of the cookie, which is set to Now+1 day, so next time the user is back the cookie will have expired.
The final argument specifies whether or not the cookie over a secured connection (which I just set to False).
  begin
    RecNo := StrToInt(Request.CookieFields.Values['RecNo']);
Other than that, cookies work just like any CGI content field.
Just remember that while a content field is part of your request, so should always be up to date, a cookie may have been rejected, resulting in a possible older value (which was still on your disk a few sessions ago).
Hidden Fields
Hidden Fields is the third, and in my book most flexible, way to maintain state information.
To implement hidden fields, we first need to write a HTML Form again, specifying the default WebActionItem, and using four different "submit" buttons (each with a different caption).
We also need to make sure the current recordnumber is stored in the generated HTML Form, and we can do this by embedding a special #-tag with the RecNo name inside.
This tag will be replaced by the current record number of the table:
  <FORM ACTION="http://www.drbob42.com/cgi-bin/Unleashed.dll" METHOD=POST>
  <H1>BIOLIFE Info</H1><HR>
  <INPUT TYPE=SUBMIT NAME=SUBMIT VALUE="First">
  <INPUT TYPE=SUBMIT NAME=SUBMIT VALUE="Prior">
  <INPUT TYPE=SUBMIT NAME=SUBMIT VALUE="Next">
  <INPUT TYPE=SUBMIT NAME=SUBMIT VALUE="Last">
  <#RecNo>
  <BR><B>Category:</B> <#Category>
  <BR><B>Common_Name:</B> <#Common_Name>
  <BR><B>Species Name:</B> <#Species_20Name>
  <BR><B>Notes:</B> <#Notes>
  </FORM>
In order to replace the #RecNo tag with the current recordnumber, we use the HTML syntax for hidden fields, which is as follows:
<INPUT TYPE=HIDDEN NAME=RecNo Value=1>This indicates that the hidden field named RecNo has a value of 1. Hidden fields are invisible to the end-user, but the names and values are sent back to the Web Server and Web Module application as soon as the user hits any of the four submit buttons.
  procedure TWebModule1.DataSetPageProducer1HTMLTag(Sender: TObject; Tag: TTag;
    const TagString: String; TagParams: TStrings; var ReplaceText: String);
  begin
    if TagString = 'RecNo' then
      ReplaceText :=
        '<INPUT TYPE=HIDDEN NAME=RecNo VALUE=' +
          IntToStr(Master.RecNo) + // current record number
        '> ' + IntToStr(Master.RecNo) + '/' + IntToStr(Master.RecordCount) + '<P>'
    else
      if ReplaceText = '(MEMO)' then
        ReplaceText := Master.FieldByName(TagString).AsString
      else
        if ReplaceText = '(GRAPHIC)' then
          ReplaceText :=
            '<IMG SRC="Unleashed.dll/image?RecNo=' +
              IntToStr(Master.RecNo) + '" ALT="RecNo=' +
              IntToStr(Master.RecNo) + '">'
        else
          if ReplaceText = '' then
          try
            ReplaceText := Master.FieldByName(FieldNameDecode(TagString)).AsString
          except
            on E: Exception do
              ReplaceText := '(' + E.ClassName + ': ' + E.Message + ')'
          end
  end;
Now all we need to do is specify the action the WebActionItem has to perform for each of the submit buttons.
We could of course have split this up in four different Web Action Items themselves, but then we'd have to use four Forms, meaning four copies of the hidden field and any other information necessary (and this gets worse, like the next example will show you in a minute).
For now, the WebActionItem event handler just needs to obtain the value of the hidden RecNo field and the value of the Submit button (with the specific action to be taken):
  procedure TWebModule1.WebModule1WebActionItem1Action(Sender: TObject;
    Request: TWebRequest; Response: TWebResponse; var Handled: Boolean);
  var
    RecNr: Integer;
    Str: String;
  begin
    RecNr := 0;
    Str := Request.ContentFields.Values['RecNo'];
    if Str <> '' then
    try
      RecNr := StrToInt(Str)
    except
    end;
    Str := Request.ContentFields.Values['SUBMIT'];
    if Str = 'First' then RecNr := 1
    else
      if Str = 'Prior' then Dec(RecNr)
      else
        if Str = 'Last' then RecNr :=
          DataSetPageProducer1.DataSet.RecordCount
        else // if Str = 'Next' then { default }
          Inc(RecNr);
    if RecNr > DataSetPageProducer1.DataSet.RecordCount then
      RecNr := DataSetPageProducer1.DataSet.RecordCount;
    if RecNr < 1 then RecNr := 1;
    if RecNr <> DataSetPageProducer1.DataSet.RecNo then
      DataSetPageProducer1.DataSet.MoveBy(RecNr -
                                          DataSetPageProducer1.DataSet.RecNo);
    Response.Content := DataSetPageProducer1.Content
  end;
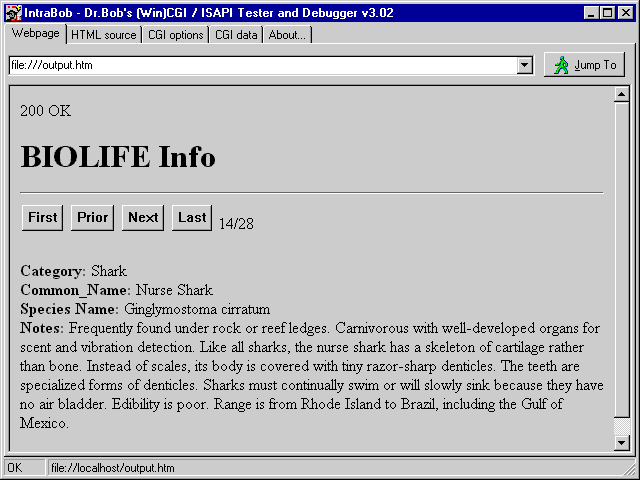
The result is the display we saw in figure X-15, but this time with four buttons that enable us to go to the First, Prior, Next or Last record of the BIOLIFE table:
There's one problem when testing the above technique with IntraBob: we use the fact that each Submit button can have a special VALUE (i.e.
the captions of the four buttons in fugyre X-16).
However, the THTML component, which is the basis for IntraBob, is not able to "capture" the names of the Submit buttons, so for IntraBob there's no difference in clicking on any of these buttons.
The source code will turn any Submit button into a "Next" action, so at least we can test that behavior.
For a fully functional test, we need a real (Personal) Web Server.
The techniques used here to keep state information and use it to browse through a table can be used in other places as well, of course.
Note that while we used the RecNo to retain the current recordnumber, you could also pass the current (unique) key values, and use them to search for the current record instead.
This can turn out to be more precise, especially when browsing a dynamic table where lots of users are adding new records while you're browsing it.
Advanced Page Producing
We saw what the individual Page Producers can do.
However, it gets really interesting once we combine these components and connect the "output" of one to the "input" of another.
The example we're gonna build at this time is a database Table viewer, like the BIOLIFE example we just saw, but this time with the ability to dynamically specify the DatabaseName (alias), TableName and fieldnames.
This is the purpose of the WebActionItems with the "/alias", "/table" and "/fields" PathInfo.
First, select the 3rd ActionItem (with the "/alias" PathInfo), and write the following code in the OnAction event handler.
Basically, we call the Session.GetAliasNames method to obtain a list of known Aliases on the current system:
  procedure TWebModule1.WebModule1WebActionItem3Action(Sender: TObject;
    Request: TWebRequest; Response: TWebResponse; var Handled: Boolean);
  var
    AliasNames: TStringList;
    i: Integer;
  begin
    Response.Content := '<H1>Alias Selection</H1><HR><P>';
    AliasNames := TStringList.Create;
    AliasNames.Sorted := True;
    try
      with Session1 do
      begin
        Active := True;
        GetAliasNames(AliasNames);
        Active := False
      end;
      Response.Content := Response.Content +
        'Please select a database alias.' +
        '<FORM ACTION="Unleashed.dll/table" METHOD=POST>' +
        'Alias: <SELECT NAME="alias">';
      for i:=0 to Pred(AliasNames.Count) do
        Response.Content := Response.Content +
          '<OPTION VALUE="'+AliasNames[i]+'">'+AliasNames[i];
      Response.Content := Response.Content +
        '</SELECT>' +
        '<P>' +
        '<INPUT TYPE=RESET> <INPUT TYPE=SUBMIT>' +
        '</FORM>';
    finally
      AliasNames.Free
    end
  end;
Note that the ACTION part of the generated HTML Form is just "Unleashed.dll/table".
This means that the name of the ISAPI DLL and the PathInfo is specified correctly, but not the exact location on the Web Server.
This works fine in combination with IntraBob (which is a local ISAPI DLL debugger host), but you need to specify the full ACTION path when you want to test and deploy using your real (Personal) Web Server.
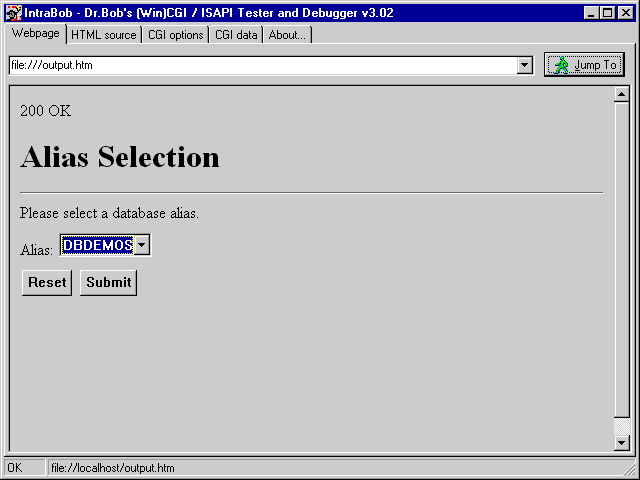
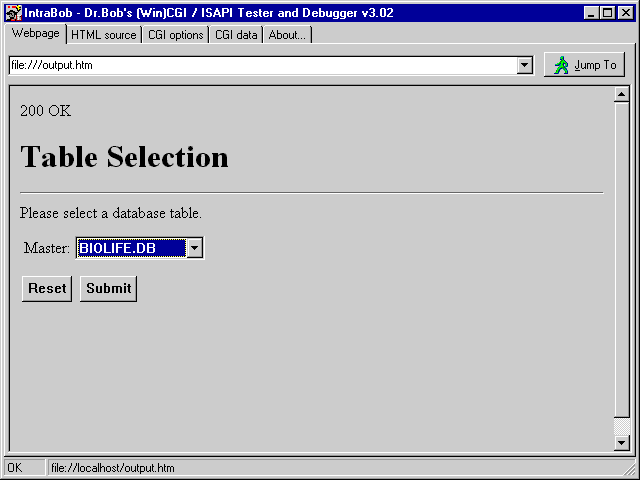
After we've selected an alias, the "/table" WebActionItem's OnAction event will be executed once we click on the Submit button (see the value of the ACTION part of the HTML Form that's generated by the OnAction handler). The next step consists of generating a list of TableNames for the Alias that we've selected in the previous step. This again can be done by using the TSession component, this time by calling the GetTableNames method:
  procedure TWebModule1.WebModule1WebActionItem4Action(Sender: TObject;
    Request: TWebRequest; Response: TWebResponse; var Handled: Boolean);
  var
    TableNames: TStringList;
    i: Integer;
  begin
    Response.Content := '<H1>Table Selection</H1><HR><P>';
    TableNames := TStringList.Create;
    TableNames.Sorted := True;
    try
      with Session1 do
      begin
        Active := True;
        Session1.GetTableNames(Request.ContentFields.Values['alias'],
                               '',True,False,TableNames);
        Active := False
      end;
      Response.Content := Response.Content +
        'Please select a database table.' +
        '<FORM ACTION="Unleashed.dll/fields" METHOD=POST>' +
        '<INPUT TYPE=HIDDEN NAME="alias" VALUE="' +
          Request.ContentFields.Values['alias'] + '">' +
        '<TABLE>';
      Response.Content := Response.Content +
        '<TR><TD ALIGN=RIGHT>Master: </TD><TD><SELECT NAME="table">';
      for i:=0 to Pred(TableNames.Count) do
        Response.Content := Response.Content +
          '<OPTION VALUE="'+TableNames[i]+'">'+TableNames[i];
      Response.Content := Response.Content +
        '</SELECT></TD></TR>';
      Response.Content := Response.Content +
        '</TABLE><P>' +
        '<INPUT TYPE=RESET> <INPUT TYPE=SUBMIT>' +
        '</FORM>';
    finally
      TableNames.Free
    end
  end;
Note that we need to pass the Alias field with the previously selected value to the next webpage as well (so we can use it to combine with the selected TableName).
This is done by passing a hidden field with the "alias" name.
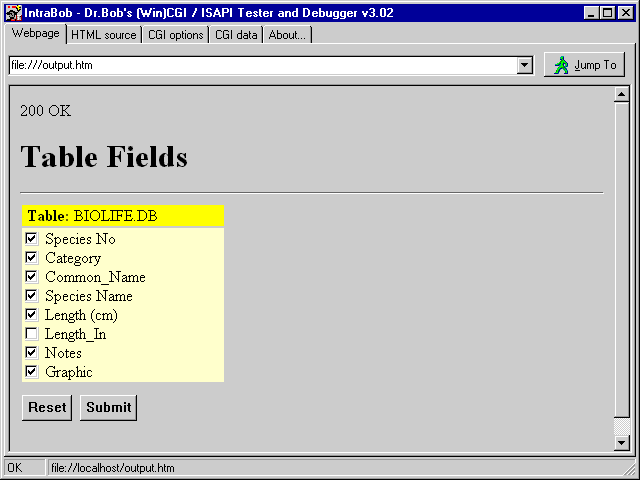
Running this WebActionItem results in a HTML Form with the new "/fields" PathInfo.
The output can be seen inside IntraBob as follows:
After we select a TableName and click on the Submit button, the "/fields" WebItemAction is executed, which is implemented as follows:
  procedure TWebModule1.WebModule1WebActionItem5Action(Sender: TObject;
    Request: TWebRequest; Response: TWebResponse; var Handled: Boolean);
  var
    i: Integer;
  begin
    Response.Content := '<H1>Table Fields</H1><HR><P>' +
           '<FORM ACTION="Unleashed.dll/browse" METHOD=POST>' +
          '<INPUT TYPE=HIDDEN NAME="alias" VALUE="' +
            Request.ContentFields.Values['alias'] + '">' +
          '<INPUT TYPE=HIDDEN NAME="table" VALUE="' +
            Request.ContentFields.Values['table'] + '">';
    Session1.Active := True;
    with Master do
    begin
      DatabaseName := Request.ContentFields.Values['alias'];
      TableName := Request.ContentFields.Values['table'];
      FieldDefs.Update; { no need to actually Open the Table }
      Response.Content := Response.Content +
        '<TABLE><TR><TD WIDTH=200 BGCOLOR=FFFF00> <B>Table: </B>' +
          TableName + ' </TD>' +
        '<TR><TD BGCOLOR=CCCCCC VALIGN=TOP>';
      for i:=0 to Pred(FieldDefs.Count) do
        Response.Content := Response.Content +
          '<INPUT TYPE="checkbox" CHECKED NAME="M' +
            FieldDefs[i].DisplayName + '" VALUE="on"> ' +
            FieldDefs[i].DisplayName + '<BR>';
    end;
    Response.Content := Response.Content +
      '</TD></TR></TABLE><P>' +
      '<INPUT TYPE=RESET> <INPUT TYPE=SUBMIT>' +
      '</FORM>'
  end;
Note that we now need to pass both the Alias field and the Table field with the previously selected values to the next webpage (so we can use it to combine with the selected FieldNames).
This is done by passing two hidden fields.
After we select a TableName and click on the Submit button, the final "/browse" TWebItemAction is executed, which is implemented as follows:
  procedure TWebModule1.WebModule1WebActionItem7Action(Sender: TObject;
    Request: TWebRequest; Response: TWebResponse; var Handled: Boolean);
  var
    Str,S: String;
    RecNr,i: Integer;
  begin
    Str := '<H1>Table Contents</H1><HR><P>' +
           '<FORM ACTION="Unleashed.dll/browse" METHOD=POST>' +
          '<INPUT TYPE=HIDDEN NAME="alias" VALUE="' +
            Request.ContentFields.Values['alias'] + '">' +
          '<INPUT TYPE=HIDDEN NAME="table" VALUE="' +
            Request.ContentFields.Values['table'] + '">' +
          '<INPUT TYPE=SUBMIT NAME=SUBMIT VALUE="First"> ' +
          '<INPUT TYPE=SUBMIT NAME=SUBMIT VALUE="Prior"> ' +
          '<INPUT TYPE=SUBMIT NAME=SUBMIT VALUE="Next"> ' +
          '<INPUT TYPE=SUBMIT NAME=SUBMIT VALUE="Last"> ' +
          '<#RecNo>';
    Session1.Active := True;
    with Master do
    try
      DatabaseName := Request.ContentFields.Values['alias'];
      TableName := Request.ContentFields.Values['table'];
      Open;
      for i:=0 to Pred(Fields.Count) do
        if Request.ContentFields.Values['M'+Fields[i].FieldName] = 'on' then
          Str := Str +
            '<INPUT TYPE=HIDDEN NAME="M' + Fields[i].FieldName + '" VALUE="on">';
      // locate correct record
      RecNr := 0;
      S := Request.ContentFields.Values['RecNo'];
      if S <> '' then
      try
        RecNr := StrToInt(S)
      except
      end;
      S := Request.ContentFields.Values['SUBMIT'];
      if S = 'First' then RecNr := 1
      else
        if S = 'Prior' then Dec(RecNr)
        else
          if S = 'Last' then RecNr := Master.RecordCount
          else // if S = 'Next' then { default }
            Inc(RecNr);
      if RecNr > Master.RecordCount then RecNr := Master.RecordCount;
      if RecNr < 1 then RecNr := 1;
      if RecNr <> Master.RecNo then
        Master.MoveBy(RecNr - Master.RecNo);
      // display fields
      Str := Str + '<TABLE CELLSPACING=4>';
      for i:=0 to Pred(Fields.Count) do
        if Request.ContentFields.Values['M'+Fields[i].FieldName] = 'on' then
          Str := Str + '<TR><TD VALIGN=TOP ALIGN=RIGHT><B>' +
                 Fields[i].FieldName + ':</B> </TD><TD>' +
          '<#' + FieldNameEncode(Fields[i].FieldName) + '></TD></TR>'
        else
          Str := Str + '-';
      Str := Str + '</TABLE>';
      DataSetPageProducer1.HTMLDoc.Clear;
      DataSetPageProducer1.HTMLDoc.Add(Str);
      Str := DataSetPageProducer1.Content;
    finally
      Close;
      Session1.Active := False;
      Response.Content := Str
    end
  end;
Note that since we want to browse through the result, we need to keep the value of the Alias, the Table as well as all selected FieldNames.
These are all passed as hidden fields (eventhough the Action specifies the same "/browse" PathInfo, we still need to supply them in every step).
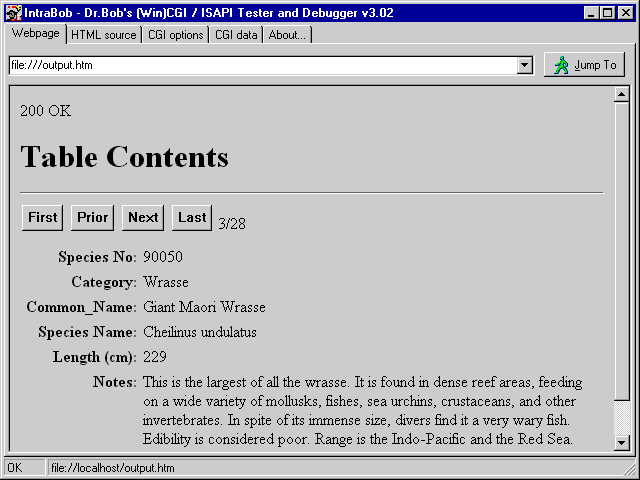
Note that all fields are shown as we want them to: even the fields with spaces inside, and the (MEMO) fields are nicely expanded as well.
Finally, we can even turn this into a master-detail output, but for that we need the TDataSetTableProducer component that we haven't covered, yet.
TDataSetTableProducer
The TDataSetTableProducer also uses a DataSet property, just like the TDataSetPageProducer.
This time, however, we get more than one record, and the output is format in a grid-like table.
Drop a second TTable component on the Web Module and call it Detail (to prepare for the Master-Detail relationship we're going to build in a little while).
Set the DatabaseName (alias) to DBDEMOS again, and the TableName to CUSTOMER.DB, and open the table by setting Active to True.
Now, drop a TDataSetTableProducer on the Web Module, and set the DataSet property to the Detail table.
The TDataSetTableProducer has a number of properties that all used to control the HTML code being generated.
First of all, we have the Header and Footer properties which hold the lines of text that precede and follow the table output.
Then we have the TableAttributes and RowAttributes properties that can be used to define the layout (Alignment, Color, etc.) of the table itself and the rows.
A more visual approach to specifying what the table should look like can be experienced using the Column property, and especially the Column property editor.
From the Object Inspector, start the Columns property editor by clicking on the ellipsis next to the Columns property (THTMLTableColumns) value.
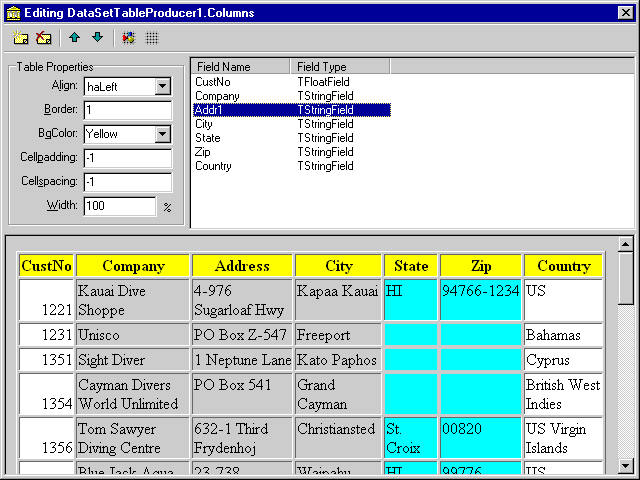
This brings up the DataSetTableProducer1.Columns editor:
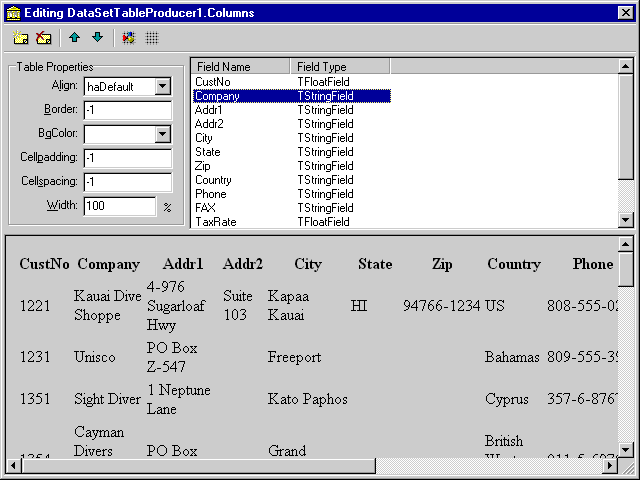
Since we opened the Detail table, we immediately see all fields in the Columns editor.
Initially, we cannot delete any fields from this view, nor can we move them.
This may "feel" like a bug (and probably is), but it can be explained by the fact that we haven't really specified which fields we would like to see in the output table.
The reason why we see all fields at this time, is because that's the default behaviour from the TTable component (if you don't specify which fields you want, you get them all).
However, in order to delete fields from the complete list, or change the order in which the fields should appear, we need to add a physical list of fields.
Right-click with the mouse on the list of fieldnames, and pick the "Add All Fields" option.
You will see no apparent change right now.
However, the default list of all fields has now become an actual list of all fields, and now we can delete fields or move them around in the list.
We can also set the output table options, like Border=1 to get a border, a background color by specifying a value for the BgColor property, etc.
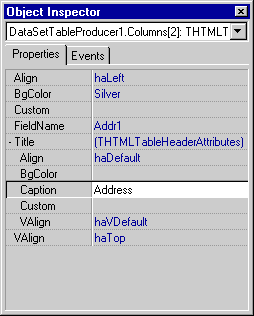
Note that individual field (= column) settings have to be done by selecting a field and going to the Object Inspector to set the BgColor, Align (left, center, right) and VAlign (top, middle, bottom, baseline) properties.
To change the caption of the fields, we can modify the Title property (again in the Object Inspector).
The Title property consists of sub-properties like Align (this time for the title only, not the entire column) and Caption.
Hence, to change the title of the Addr1 field to Address, we only need to change the Title.Caption property of the Addr1 field in the Object Inspector:
The latter changes will automatically be reflected back in the Columns editor, so after a little playing around with these properties your output preview may look as follows (depending on your tastes for colors, that is):
And that concludes the design time tweaking of the TDataSetTableProducer output. Note that we haven't written a single line of code (for the TDataSetTableProducer example), yet. Of course, we need to hook it up to an WebActionItem OnAction event handler, and we can use the default WebActionItem again (removing the existing lines of code) as follows:
  procedure TWebModule1.WebModule1WebActionItem1Action(Sender: TObject;
    Request: TWebRequest; Response: TWebResponse; var Handled: Boolean);
  begin
    Response.Content := DataSetTableProducer1.Content
  end;
That's all.
We only need to make sure the default WebActionItem is fired (by specifying no PathInfo in our request), and then the output will be as follows:
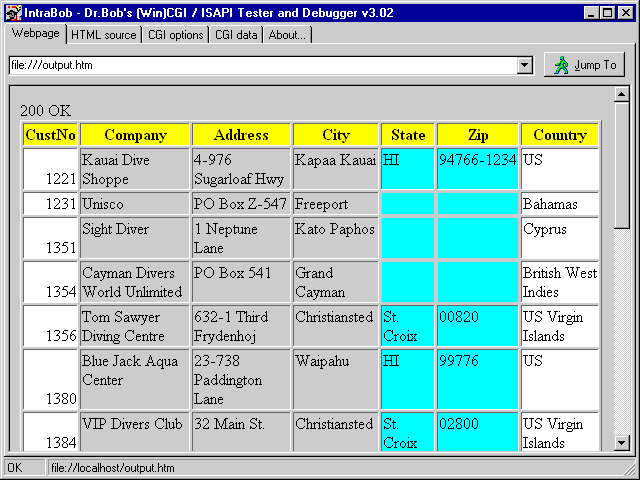
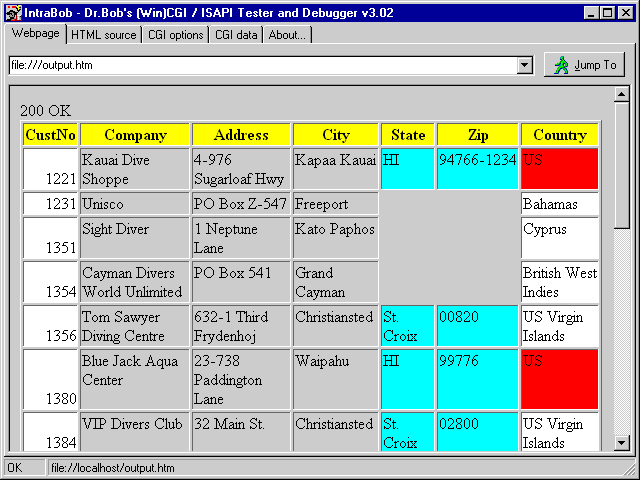
There are a few more ways we can tweak and customize the output a little further. First of all, we may want to "flag" certain countries with a special color. Like the US for which shipping can be done over land instead over by sea or by air. Or we may want to display fields with no contents (like the State and ZIP code for non-US addresses in a silver color so they don't stand out too much). Both these changes can be done in the OnFormatCell event of the TDataSetTableProducer component. All we need to do is check if the CellData is empty and then assign Silver to the BgColor, or, if the CellData is 'US' and the CellColumn = 6 we should change the BgColor to Red for example):
  procedure TWebModule1.DataSetTableProducer1FormatCell(Sender: TObject;
    CellRow, CellColumn: Integer; var BgColor: THTMLBgColor;
    var Align: THTMLAlign; var VAlign: THTMLVAlign;
    var CustomAttrs, CellData: String);
  begin
    if CellData = '' then BgColor := 'Silver'
    else
      if (CellData = 'US') and (CellColumn = 6) then
        BgColor := 'Red'
  end;
Note that the Silver and Red values are defined in the THTMLBgColor type.
Executing this new code produces the following output (compare that to figure X-19 to see the difference of a few property settings and a four lines of code):
As a last enhancement, we may want to see the orders for a specific customer in a follow-up window. Orders are linked to the CustNo identifier, so we could change that one to a link that would start another Web Module request to - dynamically - generate HTML output with an overview of the orders for the given customer. Let's put that one on hold for now, since we can use the final component - the TQueryTableProducer - to assist in solving this request.
Database Web Application Wizard
Before we continue with the last component from the WebBroker toolset, let's first quickly check out a Wizard related to the TDataSetTableProducer.
Compared to Delphi 3 C/S, the Database Web Application Wizard is a new addition to the WebBroker set of Components and Wizard.
However, a long name is not enough to impress me, and if you check out this DB Web Application Wizard in action, you'll find that all it does is allow you to specify a database alias, a table name, some field names and finally a few properties for the TDataSetTableProducer.
All it generates is a new Web Module Application, with a TWebModule, a TSession (AutoSessionName = True), a TTable, a TDataSetTableProducer and that's it.
We could have dropped these components and set their properties in the same time it took to fill-in the Wizard, but maybe the Wizard is helpful for developers who're just beginning with the WebBroker technology.
TQueryTableProducer
The TQueryTableProducer produces output similar to the TDataSetTableProducer.
The difference is not based on the fact that we can only connect a TQuery component to the TQueryTableProducer (after all, we can connect any TDataSet or derived component, including TTables and TQueries to the TDataSetTableProducer already), but the fact that the TQueryTableProducer has special support for filling in the parameters of a parameterized TQuery.
Drop a TQueryTableProducer component and a TQuery component on the Web Module.
Set the DatabaseName (alias) of the TQuery component to DBDEMOS, and write the following code in the SQL property:
  SELECT * FROM ORDERS.DB AS O
  WHERE (O.CustNo = :CustNo)
This is an SQL query with one parameter. We now need to specify the type of the parameter in the Parameter Property Editor of the TQuery component. Click on the ellipsis next to the Params property in the Object Inspector:
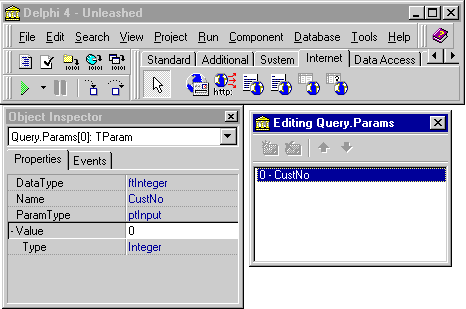
Note that the Params property editor changed from Delphi 3 to Delphi 4.
Select the CustNo parameter in the list, and go to the Object Inspector to set the DataType to ftInteger, the ParamTyp to ptInput and optionally the Value to 0 (or leave it unassigned).
We can open the TQuery component (set Active to True) to check if we didn't make any typing mistakes.
Now, click on the TQueryTableProducer, and assign Query property to the TQuery component.
Note that the TQueryTableProducer contains the same properties to customize its output as the TDataSetTableProducer (see previous section).
In fact, the TQueryTableProducer and TDataSetTableProducer are both derived from TDSTableProducer, and TQueryTableProducer adds only the Query Parameter Handling to its special behavior.
The TQueryTableProducer works by looking for the parameter name (CustNo in this case) among the ContentFields (or QueryFields, if we're using the GET method), and filling in the value of the Field as value for the Parameter.
In this case, it means we need a sample HTML startup file defined as follows:
  <HTML>
  <BODY>
  <H1>WebBroker HTML Form</H1>
  <HR>
  <FORM ACTION="http://www.drbob42.com/cgi-bin/Unleashed.dll/query" METHOD=POST>
  CustNo: <INPUT TYPE=EDIT NAME=CustNo>
  <P>
  <INPUT TYPE=SUBMIT>
  </FORM>
  </BODY>
  </HTML>
Note that the name of the input field is "CustNo", which is exactly the name of the Query parameter. If we fill in a value, like 1221 (see figure X-25), then we should get all orders for this particular customer. As long as we set the MaxRows property to a real high value (999 will do fine), we're pretty sure we see all detail records. Note that generally setting the MaxRows property to a high value (especially for the TDataSetTableProducer) results in more records that are shown, but also bigger and certainly slower output. The latter is not only caused by the fact that the output is simply bigger and has to be transferred over the network, but also by the fact that a HTML table doesn't show itself until the closing tag is reached. This means that for a really big table with 999 rows, we may actually see a blank browser window for a while until suddenly the entire tables is drawn. Anyway, to finish this example, we only need to write one single line of code in the OnAction event handler for the "/query" WebActionItem:
  procedure TWebModule1.WebModule1WebActionItem9Action(Sender: TObject;
    Request: TWebRequest; Response: TWebResponse; var Handled: Boolean);
  begin
    Response.Content := QueryTableProducer1.Content
  end;
Running the WebActionItem with the "/query" PathInfo and entering "1221" in the CustNo editbox, we get the following result:
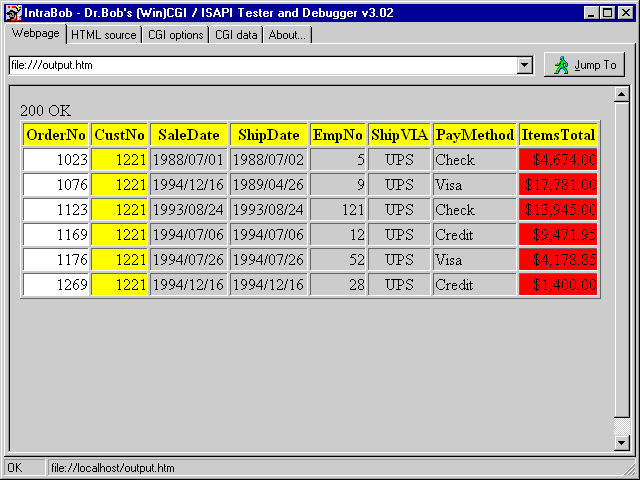
Now, this just screams to be used together with the previous TDataSetTableProducer on the Customer table.
And in fact, we can do this by extending the OnFormatCell event handler from the TDataSetTableProducer to generate a request to the "/query" WebActionItem accompanied by a hidden field (with the name CustNo) that holds the value of CustNo that we're interested in.
Basically, for the first column (where CellColumn has the value 0), we can to change the actual CellData to a hyperlink to the "/query" WebActionItem with the current CellData (i.e.
the CustNo) as value of a field named CustNo, all passed on the URL - thus by using the GET protocol for the very first time this chapter).
Alternately, we can change each CustNo value to a new FORM with the "/query" action and a hidden field with the CustNo name and specific CustNo value.
Both options are implemented in the extended OnFormatCell event handler code below:
  procedure TWebModule1.DataSetTableProducer1FormatCell(Sender: TObject;
    CellRow, CellColumn: Integer; var BgColor: THTMLBgColor;
    var Align: THTMLAlign; var VAlign: THTMLVAlign;
    var CustomAttrs, CellData: String);
  begin
    if (CellColumn = 0) and (CellRow > 0) then { first Column - CustNo }
      CellData :=
      {$IFDEF LINK}
        '<A HREF="http://www.drbob42.com/cgi-bin/Unleashed.dll/query?CustNo=' +
          CellData + '>' + CellData + '</A>'
      {$ELSE}
        '<FORM ACTION="Unleashed.dll/query" METHOD=POST>'+
        '<INPUT TYPE=HIDDEN NAME=CustNo VALUE=' + CellData + '>' +
        '<INPUT TYPE=SUBMIT VALUE=' + CellData + '>' +
        '</FORM>'
      {$ENDIF}
    else
      if CellData = '' then BgColor := 'Silver'
      else
        if (CellData = 'US') and (CellColumn = 6) then
          BgColor := 'Red'
  end;
Since IntraBob can only be used to test and debug ISAPI requests that are started by an HTML Form, we cannot test the hyperlink option (but you can test and deploy that option using your (Personal) Web Server).
Instead, we can test the "Form" option, which generates the following output for the TDataSetTableProducer on the CUSTOMER table:
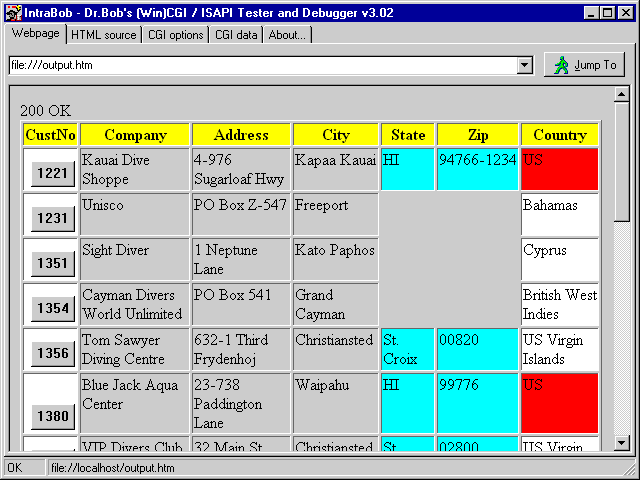
At least it should be clear from this picture what will happen as soon as you click on one of these CustNo buttons. For example, if we click on the "1231" button, to see which orders are placed for this company on the Bahamas (apart from a holiday for me and my family, that is), we get the following output:
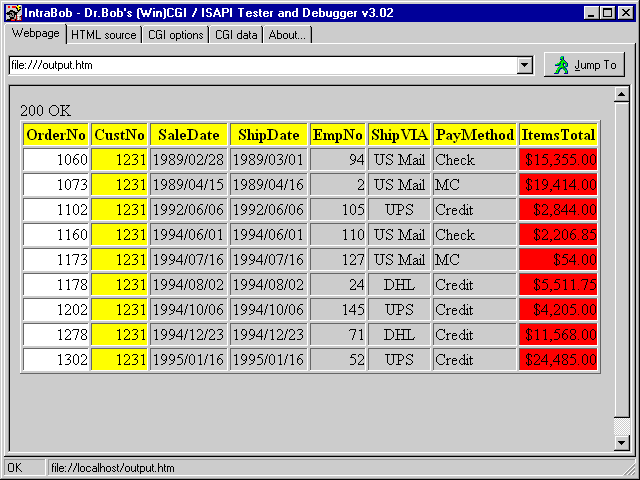
If that doesn't smell like a master-detail overview, I don't know what does. OK, I know what does: let's backtrack to the dynamic table browser (see figure X-20). Wouldn't it be nice to connect this TDataSetPageProducer (with the master record) with the output of a TDataSetTableProducer (with the detail records), but this time all in one page?
Final Master-Detail Example
The code for picking the alias doesn't have to change, since both the master and the detail table should use the same alias anyway.
Selecting a table should change to allow us to select two tables: a master and a detail table.
This can be done by the following changes in the source code (complete with IFDEFs to eliminate the extra code):
  procedure TWebModule1.WebModule1WebActionItem4Action(Sender: TObject;
    Request: TWebRequest; Response: TWebResponse; var Handled: Boolean);
  var
    TableNames: TStringList;
    i: Integer;
  begin
    Response.Content := '<H1>Table Selection</H1><HR><P>';
    TableNames := TStringList.Create;
    TableNames.Sorted := True;
    try
      with Session1 do
      begin
        Active := True;
        Session1.GetTableNames(Request.ContentFields.Values['alias'],
                               '',True,False,TableNames);
        Active := False
      end;
      Response.Content := Response.Content +
        'Please select a database table.' +
        '<FORM ACTION="Unleashed.dll/fields" METHOD=POST>' +
        '<INPUT TYPE=HIDDEN NAME="alias" VALUE="' +
          Request.ContentFields.Values['alias'] + '">' +
        '<TABLE>';
      Response.Content := Response.Content +
        '<TR><TD ALIGN=RIGHT>Master: </TD><TD><SELECT NAME="table">';
      for i:=0 to Pred(TableNames.Count) do
        Response.Content := Response.Content +
          '<OPTION VALUE="'+TableNames[i]+'">'+TableNames[i];
      Response.Content := Response.Content +
        '</SELECT></TD></TR>';
    {$IFDEF MASTERDETAIL}
      Response.Content := Response.Content +
        '<TR><TD ALIGN=RIGHT>Detail: </TD><TD><SELECT NAME="detail">';
      for i:=0 to Pred(TableNames.Count) do
        Response.Content := Response.Content +
          '<OPTION VALUE="'+TableNames[i]+'">'+TableNames[i];
      Response.Content := Response.Content +
        '</SELECT></TD></TR>';
    {$ENDIF}
      Response.Content := Response.Content +
        '</TABLE><P>' +
        '<INPUT TYPE=RESET> <INPUT TYPE=SUBMIT>' +
        '</FORM>';
    finally
      TableNames.Free
    end
  end;
The extended "/table" WebActionItem event handler produces the following output (when selecting the DBDEMOS alias):
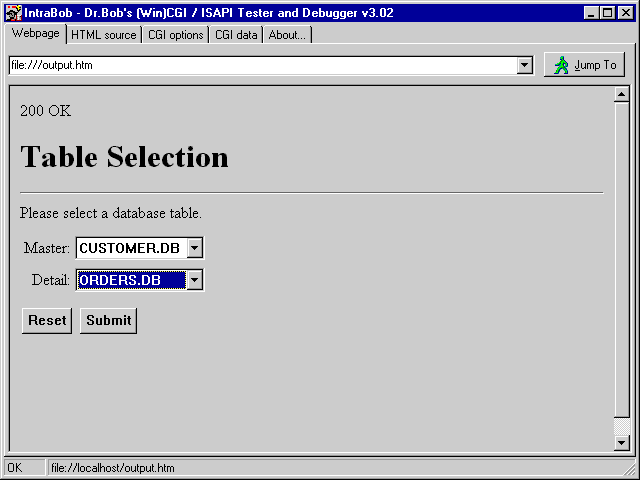
After we selected two tables (like CUSTOMER.DB as master and ORDERS.DB as detail), we should get two lists of possible fields from both tables. This can be generated using the following, extended, event handler for the "/fields" WebActionItem:
  procedure TWebModule1.WebModule1WebActionItem5Action(Sender: TObject;
    Request: TWebRequest; Response: TWebResponse; var Handled: Boolean);
  var
    i: Integer;
  begin
    Response.Content := '<H1>Table Fields</H1><HR><P>' +
    {$IFDEF MASTERDETAIL}
           '<FORM ACTION="Unleashed.dll/connect" METHOD=POST>' +
    {$ELSE}
           '<FORM ACTION="Unleashed.dll/browse" METHOD=POST>' +
    {$ENDIF}
          '<INPUT TYPE=HIDDEN NAME="alias" VALUE="' +
            Request.ContentFields.Values['alias'] + '">' +
        {$IFDEF MASTERDETAIL}
          '<INPUT TYPE=HIDDEN NAME="detail" VALUE="' +
            Request.ContentFields.Values['detail'] + '">' +
        {$ENDIF}
          '<INPUT TYPE=HIDDEN NAME="table" VALUE="' +
            Request.ContentFields.Values['table'] + '">';
    Session1.Active := True;
    with Master do
    begin
      DatabaseName := Request.ContentFields.Values['alias'];
      TableName := Request.ContentFields.Values['table'];
      FieldDefs.Update; { no need to actually Open the Table }
      Response.Content := Response.Content +
    {$IFNDEF MASTERDETAIL}
        '<TABLE><TR><TD WIDTH=200 BGCOLOR=FFFF00> <B>Table: </B>' +
          TableName + ' </TD>' +
    {$ELSE}
        '<TABLE><TR><TD WIDTH=200 BGCOLOR=FFFF00> <B>Master: </B>' +
          TableName + ' </TD>' +
        '<TD WIDTH=200 BGCOLOR=FF9999> <B>Detail: </B>' +
          Request.ContentFields.Values['detail'] + ' </TD></TR>' +
    {$ENDIF}
        '<TR><TD BGCOLOR=FFFFCC VALIGN=TOP>';
      for i:=0 to Pred(FieldDefs.Count) do
        Response.Content := Response.Content +
          '<INPUT TYPE="checkbox" CHECKED NAME="M' +
            FieldDefs[i].DisplayName + '" VALUE="on"> ' +
            FieldDefs[i].DisplayName + '<BR>';
    {$IFDEF MASTERDETAIL}
      Response.Content := Response.Content +
        '</TD><TD BGCOLOR=FFCCCC VALIGN=TOP>';
      TableName := Request.ContentFields.Values['detail'];
      FieldDefs.Update; { no need to actually Open the Table }
      for i:=0 to Pred(FieldDefs.Count) do
        Response.Content := Response.Content +
          '<INPUT TYPE="checkbox" CHECKED NAME="D' +
            FieldDefs[i].DisplayName + '" VALUE="on"> ' +
            FieldDefs[i].DisplayName + '<BR>';
    {$ENDIF}
    end;
    Response.Content := Response.Content +
      '</TD></TR></TABLE><P>' +
      '<INPUT TYPE=RESET> <INPUT TYPE=SUBMIT>' +
      '</FORM>'
  end;
This produces the following output, with two lists of fieldnames (one for CUSTOMER.DB and one for ORDERS.DB):
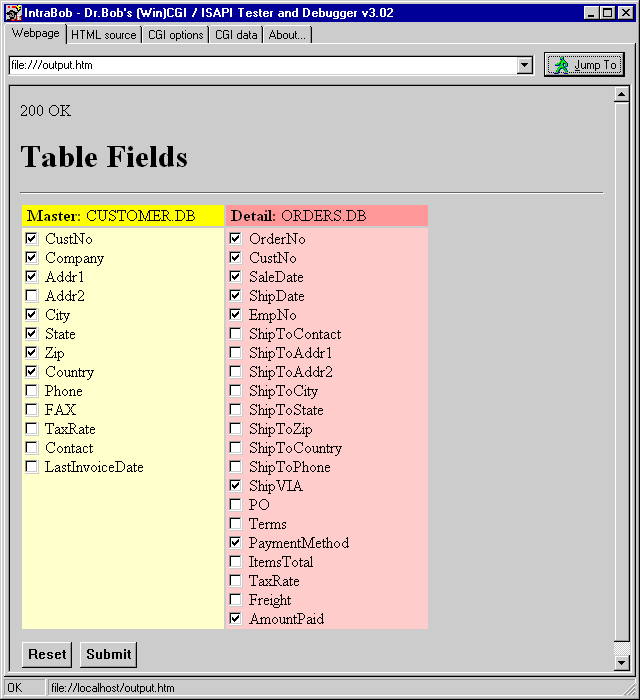
Now, we have to send both set of fields to the next step, where we actually define the master-detail relationship. This is done using the following code for the "/connect" WebActionItem event handler:
  procedure TWebModule1.WebModule1WebActionItem6Action(Sender: TObject;
    Request: TWebRequest; Response: TWebResponse; var Handled: Boolean);
  var
    MasterFs: String; { fields from master table }
    Str: String;
    i,j: Integer;
  begin
    Response.Content :=
      '<H1>Table Fields</H1><HR><P>' +
      '<FORM ACTION="Unleashed.dll/browse" METHOD=POST>' +
      '<INPUT TYPE=HIDDEN NAME="alias" VALUE="' +
        Request.ContentFields.Values['alias'] + '">' +
      '<INPUT TYPE=HIDDEN NAME="detail" VALUE="' +
        Request.ContentFields.Values['detail'] + '">' +
      '<INPUT TYPE=HIDDEN NAME="table" VALUE="' +
        Request.ContentFields.Values['table'] + '">';
    Session1.Active := True;
    with Master do
    begin
      DatabaseName := Request.ContentFields.Values['alias'];
      TableName := Request.ContentFields.Values['table'];
      Open;
      for i:=0 to Pred(Fields.Count) do
        if Request.ContentFields.Values['M'+Fields[i].FieldName] = 'on' then
          Response.Content := Response.Content +
            '<INPUT TYPE=HIDDEN NAME="M' + Fields[i].FieldName + '" VALUE="on">';
      MasterFs := '<SELECT NAME=MASTER%d_%d>';
      for i:=0 to Pred(Fields.Count) do
        MasterFs := MasterFs + '<OPTION VALUE="' +
                    Fields[i].FieldName + '"> ' +
                    Fields[i].FieldName;
      MasterFs := MasterFs + '</SELECT>';
      with Detail do
      try
        DatabaseName := Request.ContentFields.Values['alias'];
        TableName := Request.ContentFields.Values['detail'];
        FieldDefs.Update;
        IndexDefs.Update;
        Open;
        for i:=0 to Pred(Fields.Count) do
          if Request.ContentFields.Values['D'+Fields[i].FieldName] = 'on' then
            Response.Content := Response.Content +
              '<INPUT TYPE=HIDDEN NAME="D' + Fields[i].FieldName + '" VALUE="on">';
        for i:=0 to Pred(IndexDefs.Count) do
        begin
          Response.Content := Response.Content +
            '<INPUT TYPE=RADIO NAME="index" VALUE=' + IntToStr(i) + '> <B>';
          if (IndexDefs.Items[i].Name = '') and (i = 0) then
            Response.Content := Response.Content + 'Primary Index'
          else
            Response.Content := Response.Content + IndexDefs.Items[i].Name;
          Response.Content := Response.Content + '</B><TABLE>';
          j := 0;
          Str := IndexDefs.Items[i].Fields;
          repeat
            Response.Content := Response.Content +
              '<TR><TD ALIGN=RIGHT WIDTH=150>';
            if Pos(';',Str) > 0 then
            begin
              Response.Content := Response.Content +
                Copy(Str,1,Pos(';',Str)-1);
              System.Delete(Str,1,Pos(';',Str))
            end
            else
              Response.Content := Response.Content + Str;
            Response.Content := Response.Content +
              ' ==> </TD><TD WIDTH=150>' +
                Format(MasterFs,[i,j]) + '</TD></TR>';
            Inc(j)
          until Pos(';',Str) = 0;
          Response.Content := Response.Content + '</TABLE><P>'
        end
      finally
        Close // Detail
      end;
      Close // Master
    end;
    Response.Content := Response.Content +
      '<INPUT TYPE=RESET> <INPUT TYPE=SUBMIT></FORM>'
  end;
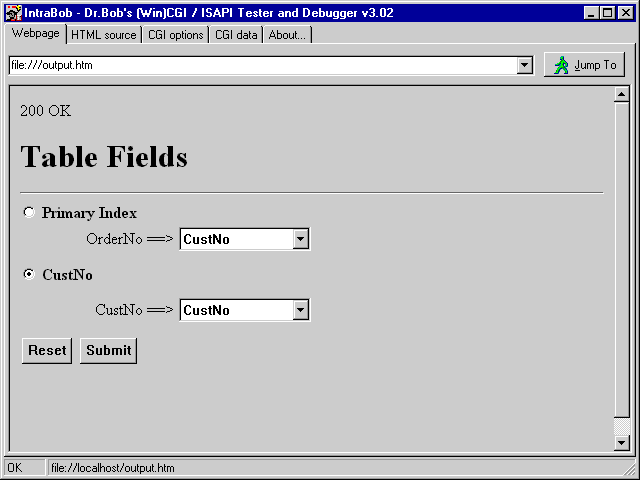
In this case, we should definitely pick the second index (CustNo) which binds the "CustNo" field of the CUSTOMER table with the "CustNo" field of the ORDERS table.
If we click on Submit again, we should get the final result: one master record and a table with the detail records connected to this master record.
The following code will produce this output:
  procedure TWebModule1.WebModule1WebActionItem7Action(Sender: TObject;
    Request: TWebRequest; Response: TWebResponse; var Handled: Boolean);
  var
    Str,S: String;
    RecNr,i: Integer;
  {$IFDEF MASTERDETAIL}
    IndexS: String;
    IndexNr,j: Integer;
  {$ENDIF}
  begin
    Str := '<H1>Table Contents</H1><HR><P>' +
           '<FORM ACTION="Unleashed.dll/browse" METHOD=POST>' +
          '<INPUT TYPE=HIDDEN NAME="alias" VALUE="' +
            Request.ContentFields.Values['alias'] + '">' +
        {$IFDEF MASTERDETAIL}
          '<INPUT TYPE=HIDDEN NAME="detail" VALUE="' +
            Request.ContentFields.Values['detail'] + '">' +
          '<INPUT TYPE=HIDDEN NAME="index" VALUE="' +
            Request.ContentFields.Values['index'] + '">' +
        {$ENDIF}
          '<INPUT TYPE=HIDDEN NAME="table" VALUE="' +
            Request.ContentFields.Values['table'] + '">' +
          '<INPUT TYPE=SUBMIT NAME=SUBMIT VALUE="First"> ' +
          '<INPUT TYPE=SUBMIT NAME=SUBMIT VALUE="Prior"> ' +
          '<INPUT TYPE=SUBMIT NAME=SUBMIT VALUE="Next"> ' +
          '<INPUT TYPE=SUBMIT NAME=SUBMIT VALUE="Last"> ' +
          '<#RecNo>';
    Session1.Active := True;
    with Master do
    try
      DatabaseName := Request.ContentFields.Values['alias'];
      TableName := Request.ContentFields.Values['table'];
      Open;
      for i:=0 to Pred(Fields.Count) do
        if Request.ContentFields.Values['M'+Fields[i].FieldName] = 'on' then
          Str := Str +
            '<INPUT TYPE=HIDDEN NAME="M' + Fields[i].FieldName + '" VALUE="on">';
      // locate correct record
      RecNr := 0;
      S := Request.ContentFields.Values['RecNo'];
      if S <> '' then
      try
        RecNr := StrToInt(S)
      except
      end;
      S := Request.ContentFields.Values['SUBMIT'];
      if S = 'First' then RecNr := 1
      else
        if S = 'Prior' then Dec(RecNr)
        else
          if S = 'Last' then RecNr := Master.RecordCount
          else // if S = 'Next' then { default }
            Inc(RecNr);
      if RecNr > Master.RecordCount then RecNr := Master.RecordCount;
      if RecNr < 1 then RecNr := 1;
      if RecNr <> Master.RecNo then
        Master.MoveBy(RecNr - Master.RecNo);
      // display fields
      Str := Str + '<TABLE CELLSPACING=4>';
      for i:=0 to Pred(Fields.Count) do
        if Request.ContentFields.Values['M'+Fields[i].FieldName] = 'on' then
          Str := Str + '<TR><TD VALIGN=TOP ALIGN=RIGHT><B>' +
                 Fields[i].FieldName + ':</B> </TD><TD>' +
          '<#' + FieldNameEncode(Fields[i].FieldName) + '></TD></TR>'
        else
          Str := Str + '-';
      Str := Str + '</TABLE>';
      DataSetPageProducer1.HTMLDoc.Clear;
      DataSetPageProducer1.HTMLDoc.Add(Str);
      Str := DataSetPageProducer1.Content;
    {$IFDEF MASTERDETAIL}
      with Detail do
      try
        DatabaseName := Request.ContentFields.Values['alias'];
        TableName := Request.ContentFields.Values['detail'];
        IndexDefs.Update;
        IndexNr := StrToInt(Request.ContentFields.Values['index']);
        IndexFieldNames := IndexDefs[IndexNr].Fields;
        MasterSource := MasterSource;
        MasterFields := '';
        j:=0;
        repeat
          IndexS :=
            Request.ContentFields.Values[Format('MASTER%d_%d',[IndexNr,j])];
          if IndexS <> '' then
          begin
            Str := Str +
              '<INPUT TYPE=HIDDEN NAME=' + Format('MASTER%d_%d',[IndexNr,j]) +
              ' VALUE=' + IndexS + '>';
            if j > 0 then
              MasterFields := MasterFields + ';' + IndexS
            else
              MasterFields := MasterFields + IndexS
          end;
          Inc(j)
        until IndexS = '';
        Open;
        for i:=0 to Pred(Fields.Count) do
          if Request.ContentFields.Values['D'+Fields[i].FieldName] = 'on' then
            Str := Str +
              '<INPUT TYPE=HIDDEN NAME="D' + Fields[i].FieldName + '" VALUE="on">';
        with TDataSetTableProducer.Create(nil) do
        try
          DataSet := Detail;
          TableAttributes.Border := 1;
          TableAttributes.BgColor := 'White';
          Columns.Clear;
          for i:=0 to Pred(Fields.Count) do
            if Request.ContentFields.Values['D'+Fields[i].FieldName] = 'on' then
              THTMLTableColumn.Create(Columns).FieldName := Fields[i].FieldName;
          Str := Str + '<P><HR><P>' + Content
        finally
          Free
        end
      finally
        Close
      end
    {$ENDIF}
    finally
      Close;
      Session1.Active := False;
      Response.Content := Str
    end
  end;
Pay special attention to the line where I create the THTMLTableColumn object, and immediately set the FieldName property to the Fields[i].FieldName.
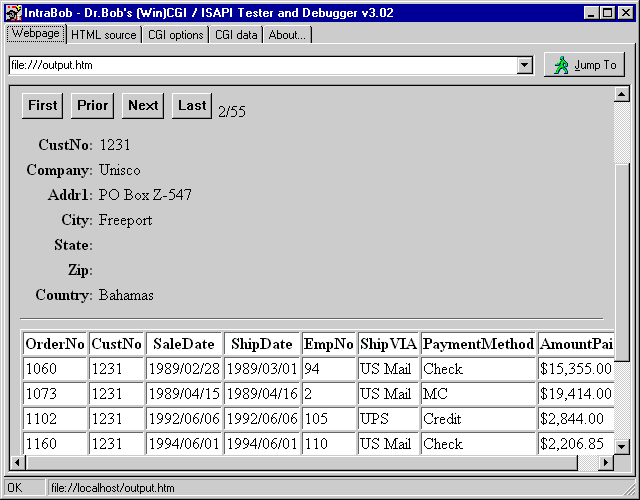
The output should be worth it: a dynamic master-detail relationship where you can specify both the master and detail, their fields and the master-detail connection all at run-time. This is truly any data, any time, anywhere.
Summary
We've seen it all.
Web Modules, Web Action Items, Page Producers and Table Producers, for CGI and ISAPI.
We've encountered problems, and solved them or produced workarounds.
And we produced some pretty useful and powerful example programs along the way.
All in all, I hope to have shown that the Delphi 4 WebBroker technology is a powerful set of tools for internet server side application development.
I certainly enjoyed myself writing this chapter, and I will certainly keep pushing Web Modules to the limit in my daily work and on my website.
See you there!