| Delphi Clinic | C++Builder Gate | Training & Consultancy | Delphi Notes Weblog | Dr.Bob's Webshop |
| Delphi Clinic | C++Builder Gate | Training & Consultancy | Delphi Notes Weblog | Dr.Bob's Webshop |
| |||||||
In this article we will build a servlet, which will use data from a table of a database. This data will presented in a table to the user in a browser. So instead of a grid control, a HTML table with all data available will be presented to the user. This way we can access tables from any type of browser, because the servlet will serve the data as plain HTML text.
| Prerequisites: | Introduction to Java Servlets |
| Techniques we use: | Java Servlet Technology, JBuilder Data Express, DataModules |
Setting up the database
For our servlet we will be using the example database of JBuilder.
We can look in the JBuilder help on how to install the example database.
This example database is an InterBase database, and we will be using the JDBC-ODBC bridge to connect our servlet to the database.
This means the database must be configured with the ODBC setup program.
All information needed to achieve this can be found in the JBuilder help under Installing and setting up JBuilder for database applications.
Creating the servlet
Now we have set up the database it is time to create the servlet.
Create a new project in JBuilder.
Next go to the Object Gallery (File | New) and select the Servlet Wizard:
(See previous servlet article to learn how to set up JBuilder for servlet developing and how to use the Servlet Wizard)
Adding database connection
We now have got a basic servlet, which will not do a thing.
But before we go further it is time for a little background on database support in JBuilder 2.
In JBuilder we find a strict distinction between components which will provide data, and components which will use the data provided.
For example all JBCL components have got a dataSet property which can be connected to a DataSet.
This DataSet provides data to the JBCL component.
So as we can see, JBuilder makes it very easy to disconnect the provider from the provided.
And this is where data modules come in the picture.
Now we don't only functionally draw a border between the provider and provided, but also put the two in different classes.
Data modules offer us a centralized design-time container for all our data access components.
And the class (in our case the servlet) which will show the data from the providers, will be a different class file.
This way of working makes your applications very flexible and maintenance of the applications becomes much easier.
(For more information about JBuilder DataExpress architecture and DataModules we can look in the Database Application Developer's Guide in the JBuilder help.)
To create a data module we go to the Object Gallery (File | New) and select the Data Module. JBuilder will show the following dialog:
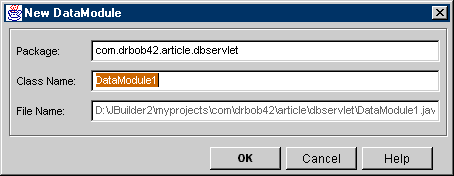
In this dialog we change the name of the data module to DatabaseServletModule. We can now click the OK button. JBuilder generates the source for the data module and adds it to our project. If we take a look at the generated source we see a static method named getDataModule. We can invoke this method from our servlet to get a handle on the data module and the data access components, which will reside in the module (it is now still empty). But we will see later on we don't have to this ourselves. JBuilder provides a wizard which will automate this process.
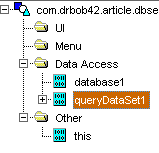
OK, we have got the data module, and it is time to add some data access components. We click on the Design tab and from the DataExpress tab on the Component Palette we add a Database component and a QueryDataSet component. When a component is selected we must click on the Data Access node in the Structure pane to add the component to the data module. This will result in the addition of a Database component named database1, and a QueryDataSet component named queryDataSet1:
We will now use database1 to make a connection with the example database. Select database1 and select the connection property in the Object Inspector. This will open the Connection dialog. In this dialog we define the connection to the database, like JDBC URL, username, and more properties. Click on the Choose URL button to select the Dataset Tutorial from the available ODBC Data sources or type in jdbc:odbc:Dataset Tutorial at the Connection URL input field. Now fill in SYSDBA for username and masterkey for password. By clicking the Test connection button we can see if we can make a successful connection to the database. And when we click this button we must see the word Success beneath the button.
Defining the query
Now we can use this connection to access data in the tables of the database.
Select queryDataSet1 in the structure pane, and active the query property in the Object Inspector.
The following dialog is shown:

Here we can define the SQL statement to get data from the tables, and set some other properties for the query.
First we must select database1 from the Database combobox.
Now the query is connected to tables from this database.
In the SQL statement field we type in: SELECT * FROM EMPLOYEE.
With this statement we will get all data from the EMPLOYEE table as a result.
Click on the Test query button to see if the query is executable.
We want to execute the query when opened, so we leave this option checked.
We can put the SQL statement in a separate resource file if we leave the Place SQL text in resource bundle option checked.
For this application we uncheck the option.
And finally we leave the Load options to Load all rows.
By clicking the OK button we close this dialog and let JBuilder generate all appropriate code.
This results in the following source for the data module:
  1: package com.drbob42.article.dbservlet;
  2:
  3: import java.awt.*;
  4: import java.awt.event.*;
  5: import borland.jbcl.layout.*;
  6: import borland.jbcl.control.*;
  7: import borland.jbcl.dataset.*;
  8: import borland.sql.dataset.*;
  9: import java.beans.*;
 10:
 11: public class DatabaseServletDataModule implements DataModule{
 12:   private static DatabaseServletDataModule myDM;
 13:   Database database1;
 14:   QueryDataSet queryDataSet1;
 15:
 16:   public DatabaseServletDataModule() {
 17:     try {
 18:       jbInit();
 19:     }
 20:     catch (Exception e) {
 21:       e.printStackTrace();
 22:     }
 23:   }
 24:
 25:   private void jbInit() throws Exception {
 26:     queryDataSet1 = (QueryDataSet) Beans.instantiate(
           getClass().getClassLoader(), QueryDataSet.class.getName());
 27:     database1 = (Database) Beans.instantiate(getClass().getClassLoader(),
           Database.class.getName());
 28:     database1.setConnection(new borland.sql.dataset.ConnectionDescriptor(
           "jdbc:odbc:Dataset Tutorial", "SYSDBA", "masterkey", false,
		   "sun.jdbc.odbc.JdbcOdbcDriver"));
 29:     queryDataSet1.setQuery(new borland.sql.dataset.QueryDescriptor(database1,
           "SELECT * FROM EMPLOYEE", null, true, Load.ALL));
 30:   }
 31:
 32:   public static DatabaseServletDataModule getDataModule() {
 33:     if (myDM == null)
 34:       myDM = new DatabaseServletDataModule();
 35:     return myDM;
 36:   }
 37:
 38:   public borland.sql.dataset.Database getDatabase1() {
 39:     return database1;
 40:   }
 41:
 42:   public borland.sql.dataset.QueryDataSet getQueryDataSet1() {
 43:     return queryDataSet1;
 44:   }
45: } |
In the jbInit() we see the instantiations, and setting of the properties of the Database and QueryDataSet component. We also see two new generated methods: getDatabase1() (lines 38-40) and getQueryDataSet1() (lines 42-44). These methods are public and return the database1 and queryDataSet1 objects. We can use these methods to reference the data access components from other classes.
To finish the data module we compile it, and our DatabaseServletDataModule is done.
Data connection to the servlet
It is time to return to our servlet, because it still doesn't do a thing.
First we must make sure we got access to the data access components in the data module.
We have seen a couple of get() methods in the data module to achieve this, and we could simply use this methods in our servlet to access the data in the database tables.
But JBuilder makes it even easier for us: the Use DataModule wizard.
We can find this wizard in the Tools menu.
Select the servlet in the project and go to the Tools menu and select Use Datamodule...
If the menu option is grayed out, we haven't selected the servlet in the project.
When we activate the wizard a new dialog is shown:
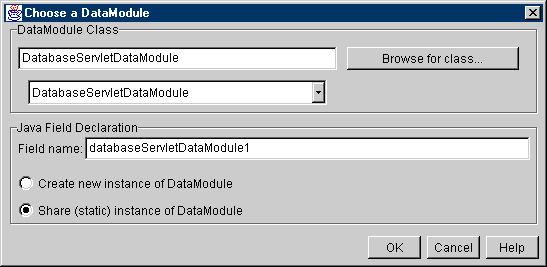
The first field is used for the name of the data module we want to use.
JBuilder already filled in the name of the data module in our project: DatabaseServletDataModule; we don't have to change this value.
The combobox contains all available data modules in the current project.
In our case it is just one data module.
The bottom part of dialog is concerned with the Java field declaration.
Here we can assign a name of the variable, which will reference to the data module.
We leave it to the default value JBuilder suggests.
And finally we can define if we want to create a new instance of the data module or a shared static instance.
If we want to reference the data module from multiple classes of our application we select the shared static instance option.
But if we only reference the data module from one class, we check the create new instance option.
And that is exactly what we need here.
We can now click on the OK button.
Let's take a look at the source of our servlet and see what code JBuilder has generated. The first thing we notice is the addition of a constructor:
  public DatabaseServlet() {
    try  {
      jbInit();
    }
    catch (Exception e) {
      e.printStackTrace();
    }
  }
|
In this constructor is a new method invoked, named jbInit():
  private void jbInit() throws Exception {
    databaseServletDataModule1 = new com.drbob42.article.dbservlet.DatabaseServletDataModule();
  }
|
The jbInit() method create a instance of the data module, and assigns it to databaseServletDataModule1. Now is the jbInit() method just fine, but the constructor isn't. A servlet doesn't have constructor, which will be invoked. But a servlet does have a init() method, which will be invoked at the start of a servlet's life, so we can invoke the jbInit() method from there. This way the data module will only be loaded once by the servlet, and is available to subsequent client requests, without being reloaded again.
Showing data
We have got our servlet connected with the data module, and now it is time to put the data module to use, and collect data from it and show it to the user.
Our code to access the data, format it to a HTML table, and send it to the browser will be implemented in the doPost() method.
Here is the piece of code, which achieve all this:
  1:     QueryDataSet dataSet = databaseServletDataModule1.getQueryDataSet1();
  2:     try {
  3:       dataSet.executeQuery();
  4:
  5:       out.println("<H2>" + dataSet.getTableName() + "</H2>");
  6:       out.flush();
  7:
  8:       Column[] columns = dataSet.getColumns();
  9:       out.println("<TABLE BORDER=1><TR>");
 10:       for (int i = 0; i < columns.length; i++) {
 11:         out.print("<TH>" + columns[i].getCaption() + "</TH>");
 12:       }
 13:       out.println("</TR>");
 14:
 15:       while (dataSet.next()) {
 16:         out.print("<TR>");
 17:         for (int i = 0; i < columns.length; i++) {
 18:           out.print("<TD>" + dataSet.format(i) + "</TD>");
 19:         }
 20:         out.println("</TR>");
 21:       }
 22:       out.println("</TABLE>");
 23:       out.flush();
 24:
 25:       dataSet.close();
 26:
 27:     } catch (DataSetException dsex) {
 28:       dsex.printStackTrace();
 29:     } finally {
 30:       if (dataSet != null) {
 31:         try {
 32:           dataSet.close();
 33:         } catch (DataSetException dsex) {
 34:           /* do nothing */
 35:         }
 36:       }
 37:     }
|
Now let's take a in-depth look to see what is happening here.
In line 1 we create a QueryDataSet object, dataSet, referencing queryDataSet1 in the DatabaseServletDataModule class.
It is just so we can use a more shorter name in the rest of our code.
Then we start a big try / catch / finally block, in which we will execute a query, use the results and close the dataSet again.
Because some of the methods on dataSet throw a DataSetException we must put them in a try / catch block.
Lines 29-37 contain the finally block.
Here we will close the dataSet if an exception has occurred and the dataSet wasn't closed regularly.
In line 3 we execute the query SELECT * FROM EMPLOYEE, we defined in the QueryDataSet object earlier.
Now the servlet will access the table and get the results.
Lines 5-6 send the name of the table, using the getTableName() method, to the browser between heading2 tags (<H2>).
Lines 8-13 start the HTML table and print a header row with the names of the columns of the table. Line 8 gets the columns as objects from dataSet and stores them in an array. We will loop through this array (lines 10-12) and put the caption of the column in the HTML table row. We get the caption with the invokation of the getCaption() method on each of the Column objects.
And in lines 15-23 we loop through the query results and put the contents of this result in the HTML table. The dataSet.next() method returns true as long as the query results have got a next result, and moves the cursor one row. So by using this method in a while loop we can loop through all available results. Next we loop through the availble columns in a row (lines 17-19) and put the value in a HTML table cell. To get the value we invoke the format() method. This method returns data from a column and a selected row in a database table as a String. This String is formatted accordingly to a display mask (if defined else default String formatting is used). So if the data is of type int, the format() method will return the int as a String. Later on we will use display masks to format date and currency columns.
Finally in line 25 we close dataSet again, so the Java Virtual Machine will be able to garbage collect the dataSet instance.
When we deploy this servlet to the web server and execute it we get a HTML table with data from the database table EMPLOYEE (See: output which is generated). This is basically what we wanted, only we are going to make some small adjustments, so the ouput will even look better.
Formatting the ouput
The first thing we notice, is the fact the column names are all in uppercase and represent the internal table column name.
And those names aren't always that descriptive.
We can change this by changing queryDataSet1 in the data module.
So we have to select the data module in our project and open the Designer.
Then we click on the plus symbol (+) in front of queryDataSet1 in the structure pane.
All available columns in the table are shown.
We select each column and change the caption property to something more descriptive.
JBuilder also provides a different way to change properties from the columns in the QueryDataSet.
Right-click on the name of the QueryDataSet variable (queryDataSet1) and select Activate designer.
This will open a grid with on every row a column with their properties.
By clicking the ![]() icon at the top we can select the properties we want to see in this grid.
icon at the top we can select the properties we want to see in this grid.
Next we are going to format the HIRED_DATE column.
This is a column of type TIMESTAMP, and by setting the displayMask property we can format the date just as we want.
By clicking on the displayMask property JBuilder opens a dialog with a list of display options.
Let's select the US short date format for our servlet.
And finally we format the SALARY column as a currency, by setting the currency property to true.
Now we can recompile the data module, and activate the servlet again. Notice we don't have to recompile our servlet source file, because we only needed to change the data module. Here we can see the resulting HTML page.
We can experiment with the different column properties to tweak the output of the servlet.
Adding a calculated column
With JBuilder's DataExpress Architecture we can easily add an extra column to our table, which contents will calculated during run-time.
For example we want to add an extra column, which will display the salary not in dollars but in Euros.
(Euros are the new currency in Europe, as from Jan. 2002).
The exchange rate between dollars and Euros we will determine at 0.8.
  1:   void queryDataSet1_calcFields(ReadRow changedRow, DataRow calcRow, boolean isPosted) throws DataSetException {
  2:     final double CHANGE_RATE = 0.88;
  3:     calcRow.setBigDecimal("SALARY_IN_EUROS", changedRow.getBigDecimal("SALARY").multiply(new BigDecimal(CHANGE_RATE)));
  4:   }
|
Downloads
Servlet source
Data module source