| Delphi Clinic | C++Builder Gate | Training & Consultancy | Delphi Notes Weblog | Dr.Bob's Webshop |
| Delphi Clinic | C++Builder Gate | Training & Consultancy | Delphi Notes Weblog | Dr.Bob's Webshop |
|
 Delphi 4 Unleashed
18. The WebBroker: CGI and ISAPI
by Bob Swart
The Delphi 4 WebBroker Technology consists of a Web Server Application Wizard and Database Web Application Wizard, together with the TWebModule, TWebDispatcher, TWebRequest, TWebResponse, TPageProducer, TDataSetPageProducer, TDataSetTableProducer and TQueryTableProducer components.
The WebBroker Wizards and Components are found in the Client/Server Suite of Delphi 4, or available as separate add-on package for Delphi 4 Professional users.
Web Modules
In this chapter you'll find that the term WebBroker and Web Module is used to refer to the same thing.
Actually, the WebBroker could be seen as a part of the entire Web Module (the action dispatcher, to be precise), but for the purpose of this chapter we can assume both terms refer to the entire collection of Wizards, Components and support Classes.
The WebBroker technology allow us to build ISAPI/NSAPI, CGI or WinCGI web server applications, without having to worry about too many low-level details.
In fact, to the developer, the development of the Web Module application is virtually the same no matter what kind of web server application is being developed (we can even change from one type to another during development, as we'll see later on).
Specifically, the Web Bridge allows developers to use a single API for both Microsoft ISAPI (all versions) and Netscape NSAPI (up to version 3), so we don't have to concern ourselves with the differences between these APIs.
Moreover, Web Server applications are non-visual applications (that is, they run on the web server, but the "user interface" is represented by the client using a web browser), and yet the Web Module wizards and components offer us design support, compared to writing non-visual ObjectPascal code.
Order Delphi 4 Unleashed from Amazon.com (US) or Amazon.co.uk (UK) |
Final Master-Detail Example
First a little introduction (for those of use who don't have a copy of Delphi 4 Unleashed - yet).
Alias & TableNames
Chapter 18 in Delphi 4 Unleashed presents a way to generate a dynamic HTML page with which the end-user can select a database alias and tablename(s) from the installed BDE on the web server (in a step-by-step Wizard-like way).
This can be used to view tables that reside on the web server by a remote user (without having to write a customised application for every table, I wrote just one single application to view a dynamically specified table at a time).
This sure works nice, but what about multiple tables?
Specifically, what about master-detail relationships?
Well, that's what this final "master-detail" example is all about.
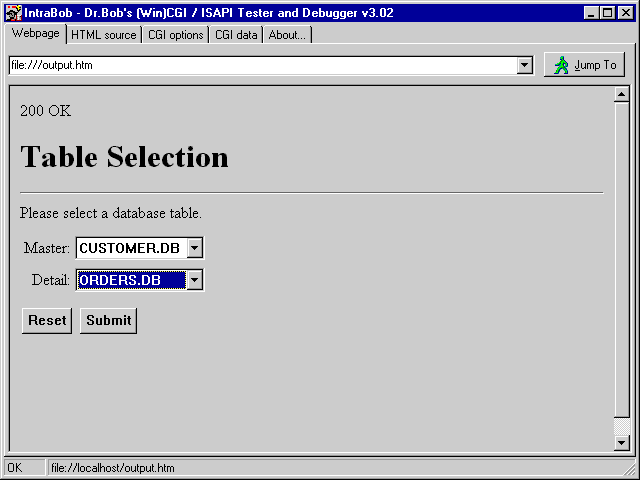
The code for picking the alias (the first step) doesn't have to change, since both the master and the detail table should use the same alias anyway. Selecting a table (the second step) should only change to allow us to select two tables: a master and a detail table. This can be done by the following changes in the source code (complete with IFDEFs to eliminate the extra code):
  procedure TWebModule1.WebModule1WebActionItem4Action(Sender: TObject;
    Request: TWebRequest; Response: TWebResponse; var Handled: Boolean);
  var
    TableNames: TStringList;
    i: Integer;
  begin
    Response.Content := '<H1>Table Selection</H1><HR><P>';
    TableNames := TStringList.Create;
    TableNames.Sorted := True;
    try
      with Session1 do
      begin
        Active := True;
        Session1.GetTableNames(Request.ContentFields.Values['alias'],
                               '',True,False,TableNames);
        Active := False
      end;
      Response.Content := Response.Content +
        'Please select a database table.' +
        '<FORM ACTION="Unleashed.dll/fields" METHOD=POST>' +
        '<INPUT TYPE=HIDDEN NAME="alias" VALUE="' +
          Request.ContentFields.Values['alias'] + '">' +
        '<TABLE>';
      Response.Content := Response.Content +
        '<TR><TD ALIGN=RIGHT>Master: </TD><TD><SELECT NAME="table">';
      for i:=0 to Pred(TableNames.Count) do
        Response.Content := Response.Content +
          '<OPTION VALUE="'+TableNames[i]+'">'+TableNames[i];
      Response.Content := Response.Content +
        '</SELECT></TD></TR>';
    {$IFDEF MASTERDETAIL}
      Response.Content := Response.Content +
        '<TR><TD ALIGN=RIGHT>Detail: </TD><TD><SELECT NAME="detail">';
      for i:=0 to Pred(TableNames.Count) do
        Response.Content := Response.Content +
          '<OPTION VALUE="'+TableNames[i]+'">'+TableNames[i];
      Response.Content := Response.Content +
        '</SELECT></TD></TR>';
    {$ENDIF}
      Response.Content := Response.Content +
        '</TABLE><P>' +
        '<INPUT TYPE=RESET> <INPUT TYPE=SUBMIT>' +
        '</FORM>';
    finally
      TableNames.Free
    end
  end;
The extended "/table" WebActionItem event handler produces the following output (when selecting the DBDEMOS alias):

Passing Information
There are a number of ways to pass information from one step to another (as I present in the chapter in more detail), and my master-detail Wizard will use the hidden fields technique.
This means that in every step we have to generate HTML code for the next step, including hidden fields that contain everything that the user selected or specified so far.
In this case, starting with step 3, it means that we need to specify the Alias and the two tablesnames (Table and Detail) as follows:
<INPUT TYPE=HIDDEN NAME="alias" VALUE="DBDEMOS">
<INPUT TYPE=HIDDEN NAME="table" VALUE="CUSTOMER.DB">
<INPUT TYPE=HIDDEN NAME="detail" VALUE="ORDERS.DB">
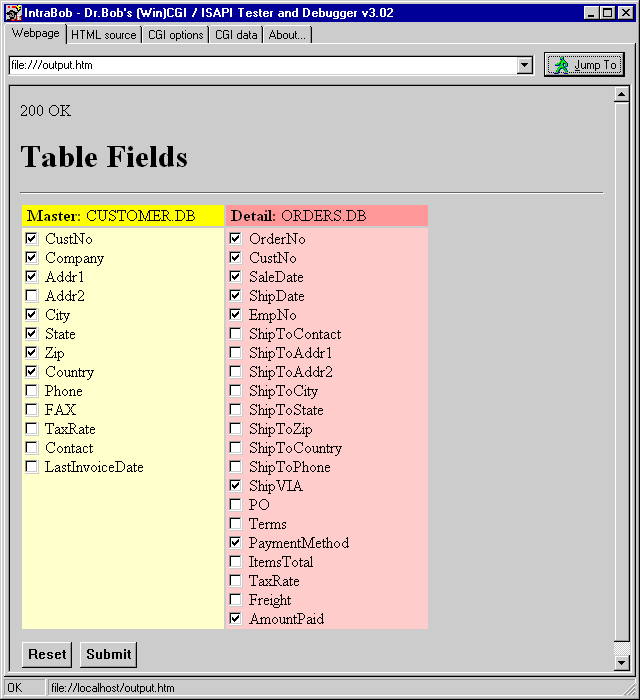
After we selected two DBDEMOS tables (CUSTOMER.DB as master and ORDERS.DB as detail), the third step should present two lists of available fields from both tables. This can be generated using the following, extended, event handler for the "/fields" WebActionItem:
  procedure TWebModule1.WebModule1WebActionItem5Action(Sender: TObject;
    Request: TWebRequest; Response: TWebResponse; var Handled: Boolean);
  var
    i: Integer;
  begin
    Response.Content := '<H1>Table Fields</H1><HR><P>' +
    {$IFDEF MASTERDETAIL}
           '<FORM ACTION="Unleashed.dll/connect" METHOD=POST>' +
    {$ELSE}
           '<FORM ACTION="Unleashed.dll/browse" METHOD=POST>' +
    {$ENDIF}
          '<INPUT TYPE=HIDDEN NAME="alias" VALUE="' +
            Request.ContentFields.Values['alias'] + '">' +
        {$IFDEF MASTERDETAIL}
          '<INPUT TYPE=HIDDEN NAME="detail" VALUE="' +
            Request.ContentFields.Values['detail'] + '">' +
        {$ENDIF}
          '<INPUT TYPE=HIDDEN NAME="table" VALUE="' +
            Request.ContentFields.Values['table'] + '">';
    Session1.Active := True;
Note that we first need to pass all specified information as hidden fields, which is done in the source code above.
We can obtain the value of these hidden fields by using Request.ContentFields.Values (if we used the GET method instead of the POST method, we should use the Request.QueryFields instead).
Now, we can obtain the actual names of the fields from the tables, by using FieldDefs.Update, so we don't need to actually open the tables themselves (we save that for the last step):
    with Master do
    begin
      DatabaseName := Request.ContentFields.Values['alias'];
      TableName := Request.ContentFields.Values['table'];
      FieldDefs.Update; { no need to actually Open the Table }
      Response.Content := Response.Content +
    {$IFNDEF MASTERDETAIL}
        '<TABLE><TR><TD WIDTH=200 BGCOLOR=FFFF00> <B>Table: </B>' +
          TableName + ' </TD>' +
    {$ELSE}
        '<TABLE><TR><TD WIDTH=200 BGCOLOR=FFFF00> <B>Master: </B>' +
          TableName + ' </TD>' +
        '<TD WIDTH=200 BGCOLOR=FF9999> <B>Detail: </B>' +
          Request.ContentFields.Values['detail'] + ' </TD></TR>' +
    {$ENDIF}
        '<TR><TD BGCOLOR=FFFFCC VALIGN=TOP>';
      for i:=0 to Pred(FieldDefs.Count) do
        Response.Content := Response.Content +
          '<INPUT TYPE="checkbox" CHECKED NAME="M' +
            FieldDefs[i].DisplayName + '" VALUE="on"> ' +
            FieldDefs[i].DisplayName + '<BR>';
    {$IFDEF MASTERDETAIL}
      Response.Content := Response.Content +
        '</TD><TD BGCOLOR=FFCCCC VALIGN=TOP>';
After we presented the available fields from the first table (the master), it's time to do the same with the detail table.
This code is virtually the same:
      TableName := Request.ContentFields.Values['detail'];
      FieldDefs.Update; { no need to actually Open the Table }
      for i:=0 to Pred(FieldDefs.Count) do
        Response.Content := Response.Content +
          '<INPUT TYPE="checkbox" CHECKED NAME="D' +
            FieldDefs[i].DisplayName + '" VALUE="on"> ' +
            FieldDefs[i].DisplayName + '<BR>';
    {$ENDIF}
    end;
    Response.Content := Response.Content +
      '</TD></TR></TABLE><P>' +
      '<INPUT TYPE=RESET> <INPUT TYPE=SUBMIT>' +
      '</FORM>'
  end;
This produces the following output, with two lists of fieldnames (one for CUSTOMER.DB and one for ORDERS.DB):

Note that I use the latest version of IntraBob to show the output of my Web Module application.
This is very helpful, especially when debugging ISAPI DLLs, since I can specify IntraBob as "host application", set breakpoints in my ISAPI source code and run from the Delphi IDE itself.
Once the user has selected the required fields from both tables and hit the "Submit" button, we have to send both set of fields to the next step, where we actually define the master-detail relationship.
This is done using the following code for the "/connect" WebActionItem event handler:
  procedure TWebModule1.WebModule1WebActionItem6Action(Sender: TObject;
    Request: TWebRequest; Response: TWebResponse; var Handled: Boolean);
  var
    MasterFs: String; { fields from master table }
    Str: String;
    i,j: Integer;
  begin
    Response.Content :=
      '<H1>Table Fields</H1><HR><P>' +
      '<FORM ACTION="Unleashed.dll/browse" METHOD=POST>' +
      '<INPUT TYPE=HIDDEN NAME="alias" VALUE="' +
        Request.ContentFields.Values['alias'] + '">' +
      '<INPUT TYPE=HIDDEN NAME="detail" VALUE="' +
        Request.ContentFields.Values['detail'] + '">' +
      '<INPUT TYPE=HIDDEN NAME="table" VALUE="' +
        Request.ContentFields.Values['table'] + '">';
    Session1.Active := True;
Again, we needed to include the alias and tablenames as hidden information first, followed by the names of the selected fields.
Since both tables can have similar fieldnames, I use an "M" prefix for the master-fieldnames, and the "D" prefix for the detail-fieldnames.
This will ensure that I can always find out if a certain field is required by the end-user:
    with Master do
    begin
      DatabaseName := Request.ContentFields.Values['alias'];
      TableName := Request.ContentFields.Values['table'];
      Open;
      for i:=0 to Pred(Fields.Count) do
        if Request.ContentFields.Values['M'+Fields[i].FieldName] = 'on' then
          Response.Content := Response.Content +
            '<INPUT TYPE=HIDDEN NAME="M' + Fields[i].FieldName + '" VALUE="on">';
      MasterFs := '<SELECT NAME=MASTER%d_%d>';
      for i:=0 to Pred(Fields.Count) do
        MasterFs := MasterFs + '<OPTION VALUE="' +
                    Fields[i].FieldName + '"> ' +
                    Fields[i].FieldName;
      MasterFs := MasterFs + '</SELECT>';
The code above is used to fill the MasterFs String with all possible fieldnames from the Master table.
The fieldnames are listed using HTML codes to result in a drop-down combobox that we can use in just a moment.
      with Detail do
      try
        DatabaseName := Request.ContentFields.Values['alias'];
        TableName := Request.ContentFields.Values['detail'];
        FieldDefs.Update;
        IndexDefs.Update;
        Open;
        for i:=0 to Pred(Fields.Count) do
          if Request.ContentFields.Values['D'+Fields[i].FieldName] = 'on' then
            Response.Content := Response.Content +
              '<INPUT TYPE=HIDDEN NAME="D' + Fields[i].FieldName + '" VALUE="on">';
Now it's time to advance to the next step, where we need to supply the end-user with the option of linking the two tables together.
In this case, we not only used FieldDefs.Update, but also IndexDefs.Update, so now we also know the contents of the Details' index fields (again, without having to actually open either table).
        for i:=0 to Pred(IndexDefs.Count) do
        begin
          Response.Content := Response.Content +
            '<INPUT TYPE=RADIO NAME="index" VALUE=' + IntToStr(i) + '> <B>';
          if (IndexDefs.Items[i].Name = '') and (i = 0) then
            Response.Content := Response.Content + 'Primary Index'
          else
            Response.Content := Response.Content + IndexDefs.Items[i].Name;
          Response.Content := Response.Content + '</B><TABLE>';
          j := 0;
          Str := IndexDefs.Items[i].Fields;
          repeat
            Response.Content := Response.Content +
              '<TR><TD ALIGN=RIGHT WIDTH=150>';
            if Pos(';',Str) > 0 then
            begin
              Response.Content := Response.Content +
                Copy(Str,1,Pos(';',Str)-1);
              System.Delete(Str,1,Pos(';',Str))
            end
            else
              Response.Content := Response.Content + Str;
            Response.Content := Response.Content +
              ' ==> </TD><TD WIDTH=150>' +
                Format(MasterFs,[i,j]) + '</TD></TR>';
            Inc(j)
          until Pos(';',Str) = 0;
          Response.Content := Response.Content + '</TABLE><P>'
        end
      finally
        Close // Detail
      end;
      Close // Master
    end;
    Response.Content := Response.Content +
      '<INPUT TYPE=RESET> <INPUT TYPE=SUBMIT></FORM>'
  end;
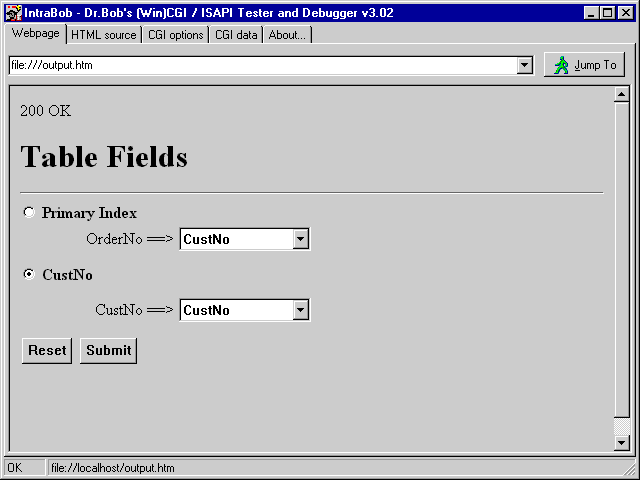
Using the CUSTOMER.DB and ORDERS.DB tables from DBDEMOS, we can chose between two indexes, one consisting of OrderNo, and one consisting of CustNo.
The second one can actually be used to connect the CustNo field from both tables, so we end up as follows:

In this case, we should definitely pick the second index (CustNo) which binds the "CustNo" field of the CUSTOMER table with the "CustNo" field of the ORDERS table.
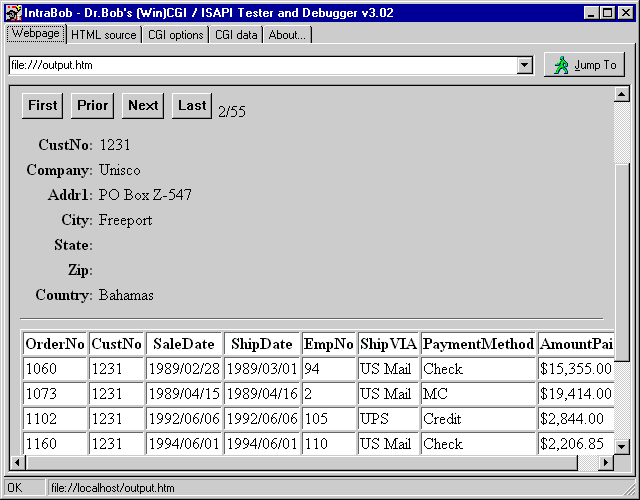
If we click on Submit again, we should get the final result: one master record and a table with the detail records connected to this master record.
The following code will produce this output:
  procedure TWebModule1.WebModule1WebActionItem7Action(Sender: TObject;
    Request: TWebRequest; Response: TWebResponse; var Handled: Boolean);
  var
    Str,S: String;
    RecNr,i: Integer;
  {$IFDEF MASTERDETAIL}
    IndexS: String;
    IndexNr,j: Integer;
  {$ENDIF}
  begin
    Str := '<H1>Table Contents</H1><HR><P>' +
           '<FORM ACTION="Unleashed.dll/browse" METHOD=POST>' +
          '<INPUT TYPE=HIDDEN NAME="alias" VALUE="' +
            Request.ContentFields.Values['alias'] + '">' +
        {$IFDEF MASTERDETAIL}
          '<INPUT TYPE=HIDDEN NAME="detail" VALUE="' +
            Request.ContentFields.Values['detail'] + '">' +
          '<INPUT TYPE=HIDDEN NAME="index" VALUE="' +
            Request.ContentFields.Values['index'] + '">' +
        {$ENDIF}
          '<INPUT TYPE=HIDDEN NAME="table" VALUE="' +
            Request.ContentFields.Values['table'] + '">' +
          '<INPUT TYPE=SUBMIT NAME=SUBMIT VALUE="First"> ' +
          '<INPUT TYPE=SUBMIT NAME=SUBMIT VALUE="Prior"> ' +
          '<INPUT TYPE=SUBMIT NAME=SUBMIT VALUE="Next"> ' +
          '<INPUT TYPE=SUBMIT NAME=SUBMIT VALUE="Last"> ' +
          '<#RecNo>';
    Session1.Active := True;
    with Master do
    try
      DatabaseName := Request.ContentFields.Values['alias'];
      TableName := Request.ContentFields.Values['table'];
      Open;
      for i:=0 to Pred(Fields.Count) do
        if Request.ContentFields.Values['M'+Fields[i].FieldName] = 'on' then
          Str := Str +
            '<INPUT TYPE=HIDDEN NAME="M' + Fields[i].FieldName + '" VALUE="on">';
      // locate correct record
      RecNr := 0;
      S := Request.ContentFields.Values['RecNo'];
      if S <> '' then
      try
        RecNr := StrToInt(S)
      except
      end;
      S := Request.ContentFields.Values['SUBMIT'];
      if S = 'First' then RecNr := 1
      else
        if S = 'Prior' then Dec(RecNr)
        else
          if S = 'Last' then RecNr := Master.RecordCount
          else // if S = 'Next' then { default }
            Inc(RecNr);
      if RecNr > Master.RecordCount then RecNr := Master.RecordCount;
      if RecNr < 1 then RecNr := 1;
      if RecNr <> Master.RecNo then
        Master.MoveBy(RecNr - Master.RecNo);
      // display fields
      Str := Str + '<TABLE CELLSPACING=4>';
      for i:=0 to Pred(Fields.Count) do
        if Request.ContentFields.Values['M'+Fields[i].FieldName] = 'on' then
          Str := Str + '<TR><TD VALIGN=TOP ALIGN=RIGHT><B>' +
                 Fields[i].FieldName + ':</B> </TD><TD>' +
          '<#' + FieldNameEncode(Fields[i].FieldName) + '></TD></TR>'
        else
          Str := Str + '-';
      Str := Str + '</TABLE>';
      DataSetPageProducer1.HTMLDoc.Clear;
      DataSetPageProducer1.HTMLDoc.Add(Str);
      Str := DataSetPageProducer1.Content;
    {$IFDEF MASTERDETAIL}
      with Detail do
      try
        DatabaseName := Request.ContentFields.Values['alias'];
        TableName := Request.ContentFields.Values['detail'];
        IndexDefs.Update;
        IndexNr := StrToInt(Request.ContentFields.Values['index']);
        IndexFieldNames := IndexDefs[IndexNr].Fields;
        MasterSource := MasterSource;
        MasterFields := '';
        j:=0;
        repeat
          IndexS :=
            Request.ContentFields.Values[Format('MASTER%d_%d',[IndexNr,j])];
          if IndexS <> '' then
          begin
            Str := Str +
              '<INPUT TYPE=HIDDEN NAME=' + Format('MASTER%d_%d',[IndexNr,j]) +
              ' VALUE=' + IndexS + '>';
            if j > 0 then
              MasterFields := MasterFields + ';' + IndexS
            else
              MasterFields := MasterFields + IndexS
          end;
          Inc(j)
        until IndexS = '';
        Open;
        for i:=0 to Pred(Fields.Count) do
          if Request.ContentFields.Values['D'+Fields[i].FieldName] = 'on' then
            Str := Str +
              '<INPUT TYPE=HIDDEN NAME="D' + Fields[i].FieldName + '" VALUE="on">';
        with TDataSetTableProducer.Create(nil) do
        try
          DataSet := Detail;
          TableAttributes.Border := 1;
          TableAttributes.BgColor := 'White';
          Columns.Clear;
          for i:=0 to Pred(Fields.Count) do
            if Request.ContentFields.Values['D'+Fields[i].FieldName] = 'on' then
              THTMLTableColumn.Create(Columns).FieldName := Fields[i].FieldName;
          Str := Str + '<P><HR><P>' + Content
        finally
          Free
        end
      finally
        Close
      end
    {$ENDIF}
    finally
      Close;
      Session1.Active := False;
      Response.Content := Str
    end
  end;
Pay special attention to the line where I create the THTMLTableColumn object, and immediately set the FieldName property to the Fields[i].FieldName.

The output should be worth it: a dynamic master-detail relationship where you can specify both the master and detail, their fields and the master-detail connection all at run-time. This is truly any data, any time, anywhere.
Summary
We've seen it all.
Web Modules, Web Action Items, Page Producers and Table Producers, for CGI and ISAPI.
We've encountered problems, and solved them or produced workarounds.
And we produced some pretty useful and powerful example programs along the way (you can download the source code and learn more).
All in all, I hope to have shown that the Delphi 4 WebBroker technology is a powerful set of tools for internet server side application development.
I certainly enjoyed myself writing this chapter, and I will certainly keep pushing Web Modules to the limit in my daily work and on my website.
So stay tuned...