| Delphi Clinic | C++Builder Gate | Training & Consultancy | Delphi Notes Weblog | Dr.Bob's Webshop |
| Delphi Clinic | C++Builder Gate | Training & Consultancy | Delphi Notes Weblog | Dr.Bob's Webshop |
| |||||||
Java servlets are server-side applications for interacting with a web browser.
A Java servlet is the Java equivalent of CGI.
Java servlets can be run by most web servers or we can servlet-enable a web server (like Microsoft IIS) by installing a servlet engine to the web server.
Allaire's JRun (www.allaire.com) is an example of a servlet engine to extend a web server so it is able to run Java servlets.
We will not begin to look at Java servlets from the start.
We can look at the JBuilder 3 help or read a book like Java Servlet Programming by Jason Hunter to learn about servlets.
In this article we must already have some Java servlet experience to create a servlet, which will display and create a dynamic image.
Let's use the JBuilder Servlet Wizard to create a beginning for our servlet.
First we create a new project (File | New project) and then we must select File | New and select the Servlet icon.
This will start the Servlet Wizard.
We must fill in several input fields.
In the Package field we fill in com.ukbug.servlet and in the Class field we fill in ImageServlet.
Check the Generate HTML page and Generate doGet() method fields.
When we click on the Next button we can fill in parameters for the servlet.
But in this example we don't need parameters, so we click on the Finish button.
JBuilder now generates a servlet source file, a HTML page and a ServletServer (for debugging purposes) source file for us and adds it to the project.
We open the ImageServlet source file and go to the doGet() method.
In this method we must create our image and send it back to the web browser in a format the web browser will understand.
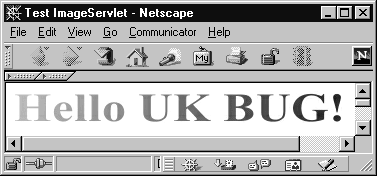
We create an image consisting of the text "Hello UK BUG!" with a gradient fill and encode it to JPEG.
Let's look at the necessary code and then look at the explanation line by line:
 1:     // Create image
 2:     int width  = 400;   // width of image
 3:     int height = 200;   // height of image
 4:     BufferedImage image = new BufferedImage(width, height,
 5:       BufferedImage.TYPE_INT_RGB);    // Image object to paint with
 6:     Graphics2D g = image.createGraphics();    // Get graphics context
 7:     g.setRenderingHint(RenderingHints.KEY_ANTIALIASING,
 8:       RenderingHints.VALUE_ANTIALIAS_ON);     // Anti-alias the painting
 9:     // First set background color to white by painting a filled rectangle
10:     g.setPaint(Color.white);
11:     Rectangle2D rectangle = new Rectangle2D.Double(0, 0, width, height);
12:     g.fill(rectangle);
13:     GradientPaint gp = new GradientPaint(
14:       0, 0, Color.lightGray,
15:       400, 100, Color.black);  // Create a gradient fill from lightgray to black
16:     g.setPaint(gp); // Use gradient fill to draw text
17:     g.setFont(new Font("Serif", Font.BOLD, 40));  // Set font bold and size 40
18:     g.drawString("Hello UK BUG!", 0, 30);  // Paint the text "Hello UK BUG!"
19:
20:     // Send image to the web browser
21:     response.setContentType("image/jpeg");  // Assign correct content-type
22:     JPEGImageEncoder encoder = JPEGCodec.createJPEGEncoder(
23:       response.getOutputStream());  // Create JPEG encoder
24:     JPEGEncodeParam jpegParams = encoder.getDefaultJPEGEncodeParam(image);
25:     jpegParams.setQuality(1.0f, false);  // Set quality to 100% for JPEG
26:     encoder.setJPEGEncodeParam(jpegParams);
27:     encoder.encode(image);  // Encode image to JPEG and send to browser

Another way to include a generated image by a servlet is to use the <img> tag.
We can use the URL for the servlet (e.g. /servlet/com.ukbug.servlet.ImageServlet) as a value for the src argument.
For example <img src="/servlet/com.ukbug.servlet.ImageServlet" alt="Dynamic generated by Java servlet">.