| Delphi Clinic | C++Builder Gate | Training & Consultancy | Delphi Notes Weblog | Dr.Bob's Webshop |
| Delphi Clinic | C++Builder Gate | Training & Consultancy | Delphi Notes Weblog | Dr.Bob's Webshop |
| ||||||

C++Builder XE2 and FireMonkey
You probably heard the news: Embarcadero released C++Builder XE2 a couple of weeks ago, featuring a number of new capabilities like a C++ back-end compiler to produce 32-bit Windows as well as 32-bit Mac OS X applications, based on a new FireMonkey GUI framework, and the ability to deploy, run and debug these applications.
In this article, I'll introduce the new FireMonkey GUI framework and the cross-platform capabilities of C++Builder XE2, producing a cross-platform 32-bit Windows - Mac OS X application.
Mac OS X
Yes, you read it right: C++Builder XE2 is now capable of producing 32-bit Mac OS X executables (for the Intel platform, that is).
The C++Builder XE2 IDE itself is still a 32-bit Windows application, so when it comes to deployment or running/debugging from the IDE, we’ll need a little help from a tool called the Platform Assistant Server (more about this later).
Delphi XE2 also contains a compiler that can produce 64-bit Windows applications – this is expected to be available for C++Builder in the next release (XE3?), just as 64-bit Mac OS X and Linux support is something we can expect in the future.
FireMonkey
The VCL (Visual Component Library) currently used in C++Builder applications for Windows, is tied to the Windows API, and not easy to make “cross-platform”.
In order for an application to look like a Windows application on Windows, and a Mac application on Mac OS X or iOS, Embarcadero had to bring in (read: buy) a whole new set of visual components as GUI framework.
They actually call it the FireMonkey Application Platform, and it is specifically designed for cross-platform application development.
Note that the VCL is not dead or being replaced.
The VCL is still the best solution for native Windows applications.
But for cross-platform applications that need to move to other platforms like Mac OS X and iOS (and in the future probably Linux), we should use the FireMonkey Application Platform.
The FireMonkey Application Platform presents cross-platform controls and concepts like forms, dialogs, buttons, menus, etc.
It supports 2D and 3D graphics and uses the GPU for the graphics, freeing the CPU itself for doing the “real work” (like calculations or database operations).
The FireMonkey designer may feel a bit awkward at first, since it’s not entirely the same as the VCL designer.
However, remember that FireMonkey is at version 1.0, and there will be many enhancements (and fixes) in the time to come.
FireMonkey Example
To demonstrate the FireMonkey Application Platform, let’s create a new application using C++Builder XE2.
Using File | New – Other menu, we get into the Object Repository and can see a number of different FireMonkey project targets for C++Builder:
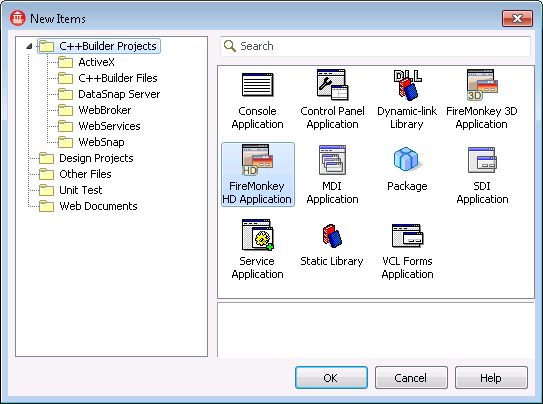
A FireMonkey 3D Application is capable or doing more graphic “stuff” than a FireMonkey HD Application.
However, as a consequence, a FireMonkey 3D Application requires more power from the GPU.
The FireMonkey HD Application is the one that most closely resembles a VCL Forms Application, with a 2D Form Designer that can host FireMonkey controls that almost look and feel like good-old VCL controls.
As an example, let’s create a FireMonkey HD Application for C++Builder, which creates a new project starting with a new empty form with a black caption and border.
Save the project in ProjectXE2 and the form in MainForm.cpp (in case you want to play along, for example using the trial-edition of C++Builder XE2).
One thing that you may immediately notice: if you click on the FireMonkey designer area for the form, you cannot do Alt+F to go to the File menu.
Somehow, the Alt menu strokes are disabled here.
Also, the nice IDE short-cut of Edit | Copy to copy the contents of the VCL Forms Designer is absent for the FireMonkey designer, so I had to make a screenshot the hard way, as can be seen below:
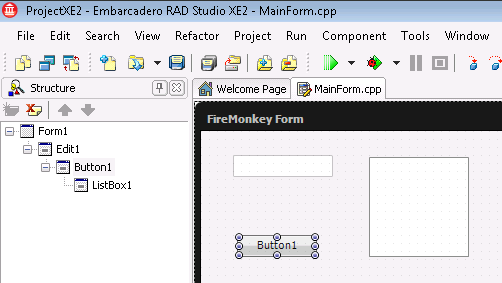
Examine the Tool Palette for a list of FireMonkey controls that can be used.
The Standard category contains a number of familiar controls like TEdit, TListBox and TButton, which can be placed on the form.
Warning: do not place them “on top of each other” (the effect that you get when you enter “Edit” in the Tool Palette search box and type <enter>, followed by “Button” and another <enter> followed by “ListBox” and a final <enter>.
This will place the TListBox as child of the TButton as child of the TEdit (unlike the way the VCL works), which is probably not what you want, and can lead to funny effects (if you move the TButton, the TListBox will move along, and if you move the TEdit, all controls will move simultaneously).
See the Structure Pane of the previous screenshot.
Speaking of positioning the FireMonkey controls; this is another area of differences with the VCL.
FireMonkey doesn’t expose a Top or Left property, but uses a Position property with X and Y subproperties.
There are no Anchors, but a Margin and a Padding property that appear to conflict with the way margins and paddings work in the VCL or CSS.
Anyway, after you’ve placed a TListBox, TEdit and a TButton on the TForm (at least the control names are the same, although they originate from different units), we can write the well-known event handler for the OnClick of the TButton:
  void __fastcall TForm1::Button1Click(TObject *Sender)
  {
    ListBox1->Items->Add(Edit1->Text);
  }
And then we can run the application, which by default will show up as a 32-bit Windows application (the default target platform of any project in C++Builder XE2).

This sure looks and feels like a regular Windows application. In fact, it already contains some more-than-regular effects, like the “glow” around the TEdit that has the focus (visible in the screenshot). This effect can take up some processing power (GPU or CPU), and if the application becomes too slow, you can disable the effect as follows:
GlobalDisableFocusEffect := true;
Mac OS X
In order to run the same project, without any changes to the source code, on Mac OS X, we need to perform some additional steps.
First of all, you need a Mac running Mac OS X version 10.6 (Snow Leopard) or later.
In order to deploy from your Windows development machine to the Mac target machine, you also need to install a separate utility called the Platform Assistant (paserver) on the Mac.
The paserver can be found on your development machine in the C:\Program Files\Embarcadero\RAD Studio\9.0\PAServer directory.
There is a setup_paserver.zip to be used on Mac OS X, and a setup_paserver.exe to be used on a 64-bit Windows machine.
You need the setup_paserver.zip and open it on the Mac where you need to unzip it and run the setup_paserver application to launch the installer of the Platform Assistant Server application.
A number of screens need to be passed (leaving the default settings intact), after which the Platform Assistant Server is installed on the machine, in my case in the /Users/bob/Applications/Embarcadero/PAServer directory:
Now, as soon as you start the paserver application itself, it will start a terminal window and ask for a password.
Don’t panic, this is not a password that you should have remembered or written down somewhere.
Rather, it’s the password that you can define here (at the deployment machine) and that you have to specify at the development machine to allow the development machine access to the deployment machine (and avoid any other “visitors” to access the Mac at port 64211 as well).
Once the password is entered, we can leave the paserver running at the Mac, and return to the Windows development machine to compile and run (with or without debugging) and/or deploy the project as a Mac OS X application.
Mac OS X Development
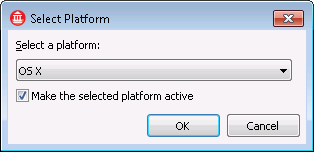
The next step back at C++Builder XE2 involves the addition of a new target platform.
In the Project Manager, open the Target Platforms node to verify that it only contains the default 32-bit Windows target.
Then, right-click on the Target Platforms node and select “Add Platform…” to add a new target platform.
In the dialog that follows, select OS X as new target:
A Target Platform also needs a Remote Profile with the information to connect to the remote target machine.
If a remote profile for the selected platform already exists, then C++Builder XE2 will assign it as remote profile.
Otherwise, you will be prompted to select or create a new remote profile as soon as you try to run the project for OS X.
Initially, the list of Remote Profiles will be empty, so you need to click on the “Add…” button to create a new Remote Profile.
You can specify the name of the remote profile.
On the next page of the dialog, we can specify the Host Name of the Mac OS X machine (or the IP-address).
The Port number is already specified using the default port number 64211.
Finally, do not forget to specify the same password here as the one you specified in the paserver back on the Mac.
Click on the Test Connection button to ensure you can talk to the Mac.
If the connection is refused, then you may have to configure the firewall on the Mac to allow the incoming connection.
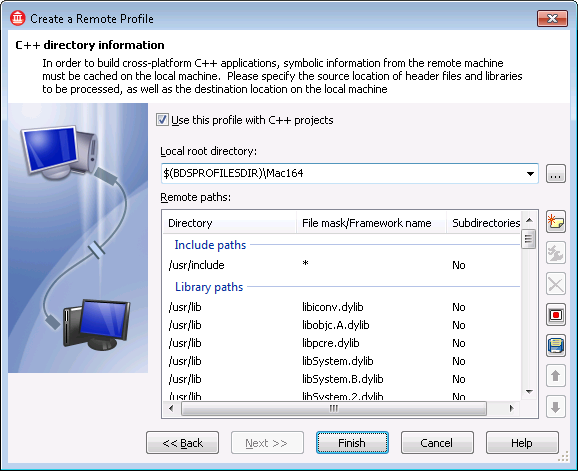
The next page in the Remote Profile Wizard is a page only relevant for C++Builder developers (in which case you need to cache symbolic information from the remote machine on the local machine).
As a result, the Project Manager will now show the Remote Profile next to the Target Platform in the Project Manager:
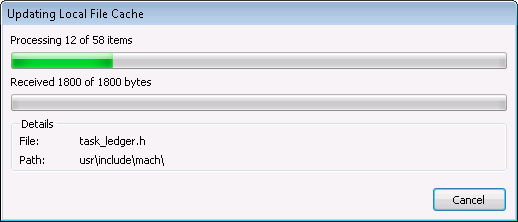
Also, if the Remote Profile selection was shown as a result of the initiative to “Run” the application, the actual application will now be running on your Mac OS X machine! For a Delphi XE2 application, this will be almost instant, but for C++Builder XE2 applications, the additional deployable files need to be transferred between the Mac and the development machine, updating a local file cache, which is shown in a little progress dialog:
After that dialog is done, you can switch to the Mac, and see the FireMonkey demo application running as a native Mac OS X application!
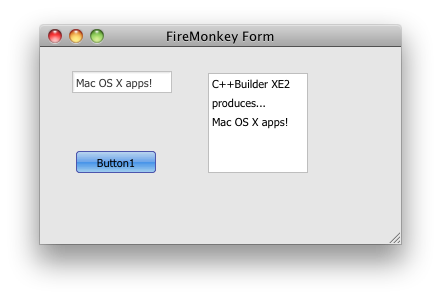
And this certainly looks like a native Mac OS X application to me.
If you compare this screenshot to the Windows edition of the FireMonkey Demo, you will see the same ListBox, Edit and Button, but the actual look-and-feel is now totally different and Mac-like, while the Windows edition truly feels like a Windows application.
Of course, these are just simple demo applications, but you should get the idea…
Apart from Running without Debugging, you can also press the “Run” button which will enable the debug desktop at the development machine, and launch the client at the Mac OS X machine.
This will allow you to see and click on the application at the Mac, while the breakpoints and other debugging features will function at the remote development machine.
Very convenient (although the remote debugging connection is sometimes a bit fragile, and connections can be lost at times).
Mac OS X Deployment
When it comes to deployment of your application, especially to the Mac running OS X, you need to perform a number of steps again.
Using Project | Deployment you can get a Deployment tab in the IDE that shows the files that need to be deployed to the Mac OS X machine.
If you connect to the deployment machine, you can see the Remote Status.
The green arrow will actually deploy the project files.
On my Mac, they end up in the /Users/bob/Application/Embarcadero/PAServer/scratch-dir/Bob-Mac164 where Bob is the name of the remote user (since the local user is called "bob") and Mac164 is the name of my Remote Profile.
ProjectXE2 is the archive that contains all selected deployment files, and can be run as stand-alone application on the Mac.
We can also copy it to another Mac (running at least Mac OS X Snow Leopard) and run it from there.
LiveBinding for FireMonkey
For a LiveBindings demo that shows the biolife data in a TStringGrid like the last VCL LiveBindings example, we need to continue the demo with a TClientDataSet and a TDataSource component.
The biolife example data can be found in the C:\Users\Public\Documents\RAD Studio\9.0\Samples\Data directory as biolife.xml.
However, after assigning the FileName property of the TClientDataSet, we should open the TClientDataSet (by setting the Active property to True), and then clear the FileName property.
Obviously, the Windows fully qualified path will be invalid when run on the Mac.
However, with the TClientDataSet open, the data will be stored in the form file (which is .fmx for FireMonkey by the way, where VCL uses .dfm).
Make sure to connect the TDataSource to the TClientDataSet, in the usual way, and then place a TStringGrid on the FireMonkey form.
The display will be a bit different than usual, with the black border, and the TStringGrid itself will also look a bit different at design-time.
The TStringGrid has an Align property that works in FireMonkey as well.
We get a bit more choices however: alBottom, alCenter, alClient, alContents, alFit, alFitLeft, alFitRight, alHorizontal, alHorzCenter, alLeft, alMostBottom, alMostLeft, alMostRight, alMostTop, alNone (the default), alRight, alScale, alTop, alVertCenter, and alVertical.
For this demo, I’ve selected alFitLeft.
Link to DB DataSource
Next, we can open up the LiveBindings property of the TStringGrid, and notice that apart from a choice “New LiveBinding…” (that we saw in the VCL world), there is now also a choice “Link to DB DataSource…”.
If we pick the latter, we get a dialog where we can select the datasource (DataSource1).
We can even “open up” the DataSource, to see which fields are exposed and made available by selecting that particular DataSource.
If you click on OK now, then two new components will be created and placed on the FMX form: a TBindScopeDB and a TBindingsList (that we saw before in the VCL example).
Also, the TStringGrid is filled with the “live” data from the TClientDataSet:
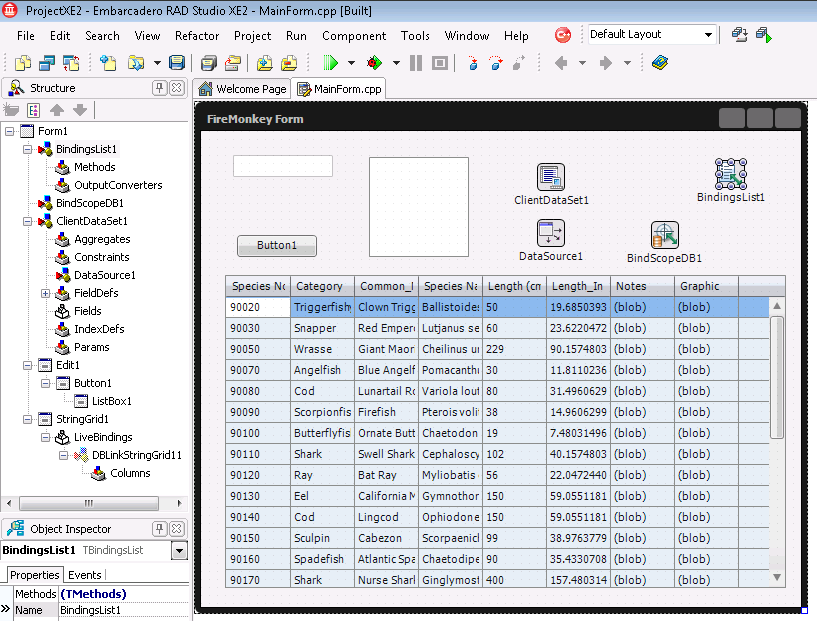
Where did the magic come from? If you double-click on the BindingsList, you’ll see a DB links category (one that isn’t available to select in the VCL world), and the DBLinkStringGrid11 that links the grid control StringGrid1 to the source BindScopeDB1 (which was also autocreated):If you double-click on the DBLinkStringGrid11, you can see all the individual Columns and Expressions that were generated automatically.
The next screenshot shows the Biolife table in a FireMonkey form running on Mac OS X.

To display the biolife picture, you can add a TImageControl, with Align set to alClient, and use the LiveBinding property to create a New DB Link to the Graphic field. I leave that as exercise for the readers who already have XE2 to play along.
Libmidas.dylib Deployment
Running the application on the Mac OS X would result in an error regarding a missing libmidas.dylib image, which means we have to add the libmidas.dylib from the C:\Program Files\Embarcadero\RAD Studio\9.0\binosx32 directory to the list of Deployment files:

The libmidas.dylib file can also be found in the C:\Program Files\Embarcadero\RAD Studio\9.0\Redist\osx32 directory; the official place for all OS X (32-bit) redistributable files.
The last screenshot is an overview of all files that need to be deployed (in the bundle) for the C++Builder FireMonkey example.
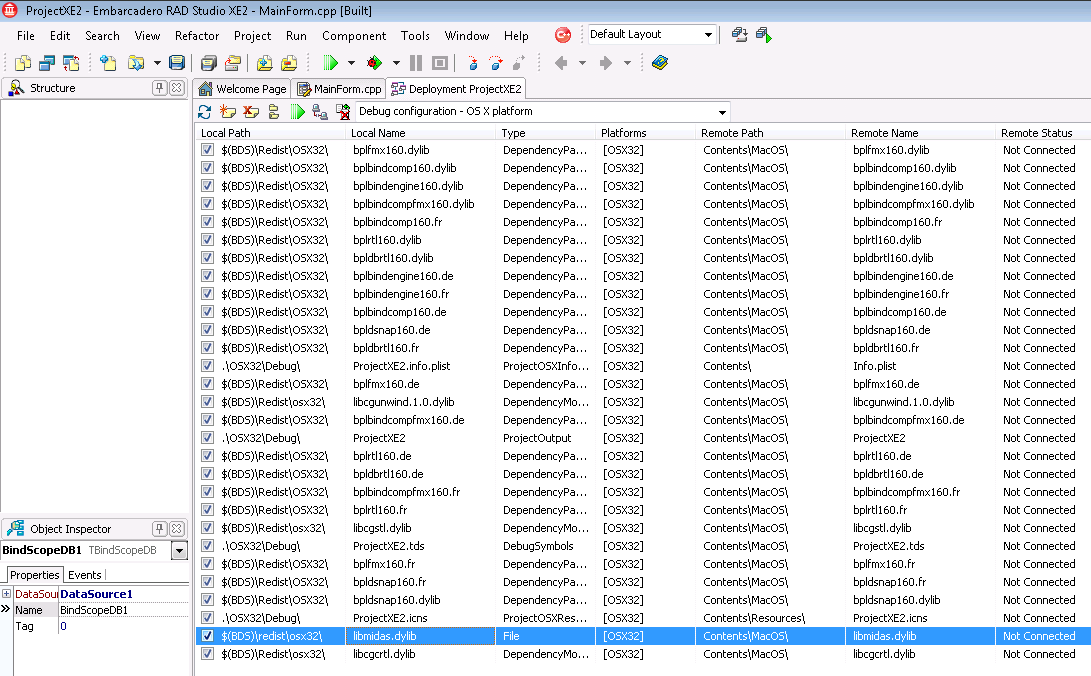
Just clicking the Run button will take care of these deployment all details, of course.
Conclusions
C++Builder XE2 has been extended with powerful Mac OS X client target capabilities.
Not for server processes (like web projects, web services or DataSnap services), but it works great for clients.
Updates to the FireMonkey framework (and documentation!) are promised by Embarcadero on a regular basis.


