| Delphi Clinic | C++Builder Gate | Training & Consultancy | Delphi Notes Weblog | Dr.Bob's Webshop |
| Delphi Clinic | C++Builder Gate | Training & Consultancy | Delphi Notes Weblog | Dr.Bob's Webshop |
| ||||||

Diamondback / Delphi 2005 and Databases
In this paper, I will use Diamondback (aka Borland Delphi 2005) and explain what techniques are available to connect to and work with databases.
For each of the techniques, I will briefly show how it works, and which databases can be accessed through it.
Diamondback was the codename of Delphi 2005, and in this article I'm using the Diamondback BorCon 2004 Preview Edition from the Borland Conference (Sept 2004) in San Jose.
As a result, some features may differ from the final released version of Delphi 2005.
Delphi 2005 Targets
Delphi 2005 is a development environment with multiple personalities (isn't that called schizophrenic?), that we can use to build Delphi Win32, Delphi for .NET as well as C# applications.
Delphi Win32 can produce VCL applications (note that CLX is not present in Delphi 2005 - at least not in the Diamondback Preview edition, and neither is support for DataSnap Servers for .NET; DataSnap for .NET is client-side only).
Using C# we can produce WinForms or WebForms applications.
The difficult choices come with Delphi for .NET targets: these can be VCL for .NET (migrated from Win32 or started anew) or WinForm/WebForm projects.
To give a quick overview of the available data access technologies, take a look at the following tables:
| VCL and VCL for .NET | |
| BDE | dBASE, Paradox |
| dbExpress | InterBase, SQL Server, Oracle, DB2, Informix, MySQL, SQL Anywhere |
| InterBase Express (IBX) | InterBase |
| dbGo for ADO | SQL Server, Access, etc. |
| WinForms / Web Forms (Delphi for .NET and C#) | |
| ADO.NET | SQL Server, Oracle, OLEDB, ODBC.NET, etc. |
| Borland Data Provider for .NET | SQL Server, Oracle, DB2, InterBase, Sybase, MS Access |
As you can see, there are several different ways to connect to and work with SQL Server (ADO.NET, BDP, dbGO for ADO, and dbExpress) as well as InterBase (BDP, dbExpress and IBX).
VCL and VCL for .NET
Let's start with the VCL (for .NET) target in Delphi 2005.In case you wonder why people would want to use VCL for .NET in the first place, I do not want to spend a lot of space discussing that particular issue, but want to refer you to Danny Thorpe's article about "Why VCL for .NET" with which I totally agree.Whether it's a new VCL for .NET project, or the migration of an existing VCL project to .NET, you have several choices to work with databases.
The Borland Database Engine (BDE) is still available on .NET, but only supports dBASE and Paradox local tables.The SQL Links part of the BDE was already deprecated and is no longer available in Delphi 2005.This means that existing VCL applications that use SQL Links will have to undergo some serious work if you plan to migrate them to the .NET Framework.If you want to stick to the VCL (for .NET), then dbExpress is your best bet, offering connectivity to InterBase, SQL Server, Oracle, IBM DB2, Informix, MySQL, and SQL Anywhere.
The exception to this can be databases that have good ADO connectivity, like SQL Server and Access.
For those, you could use dbGo for ADO.
Note that the dbGo for ADO components were not available in Delphi 8 for .NET, but are now present in Delphi 2005 to support the migration of dbGo for ADO projects to .NET (which is different from using ADO.NET).
dbExpress
As an example, let's now build a VCL for .NET application with Delphi 2005, and use dbExpress to connect to the InterBase Employee.gdb database.
First, start a new VCL Forms application in Delphi 2005, save the form in MainForm.pas and the project itself in VCLDBX.bdsproj.Note that you can use a data module with VCL for .NET (but not in WinForms projects), so you can add a data module to this VCL Forms project if you wish - or just place the components on the main form itself.
Start with a TSQLConnection component (from the dbExpress category), and place it on the form or data module.This is the dbExpress component that connects to the DBMS and is responsible for the communication between the DBMS and the other dbExpress components.We must right-click on it to edit the connection properties.This will give you the dbExpress Connections Editor, as shown below:
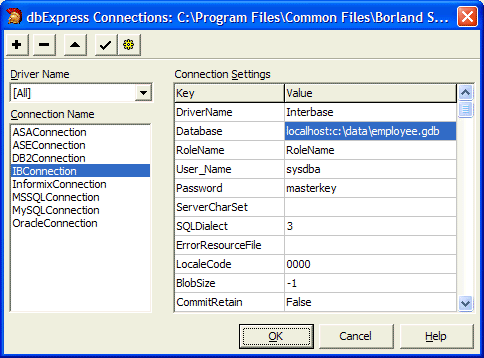
The dbExpress Connections Editor uses information found in two .ini files, from the C:\Program Files\Common Files\Borland Shared\DBExpress directory, namely dbxdrivers.ini (for the list of dbExpress drivers) and dbxconnections.ini (with the connection settings).
Changes that you make in the Connections Editor are also saved to the dbxconnections.ini file - but you can also modify them outside of the Delphi IDE (at your own risk, of course).Third-party dbExpress drivers can be added to the dbxdrivers.ini file.
Note the value of the Database property, which should have the machinename (or IP-address) as prefix to the fully qualified path of the database GDB file itself.Without this prefix, you can connect to Local InterBase only, so make sure to include this part.To test the connection while still in the dbExpress Connections Editor, you can click on the button with the checkmark.After the login dialog, this will either give you a "Successfully Connected" message, or a detailed errormessage that can be used to fix the problem.
After you close the dbExpress Connections Editor, the property values for the TSQLConnection component are saved in the .nfm file.If you examine this file, you'll see the following definition inside:
  object SQLConnection1: TSQLConnection
    ConnectionName = 'IBConnection'
    DriverName = 'InterBase'
    GetDriverFunc = 'getSQLDriverInterBase'
    LibraryName = 'dbexpint.dll'
    Params.Strings = (
      'DriverName=InterBase'
      'Database=localhost:C:\data\employee.gdb'
      'RoleName=RoleName'
      'User_Name=sysdba'
      'Password=masterkey'
      'ServerCharSet='
      'SQLDialect=3'
      'ErrorResourceFile='
      'LocaleCode=0000'
      'BlobSize=-1'
      'CommitRetain=False'
      'WaitOnLocks=True'
      'InterBase TransIsolation=ReadCommited'
      'Trim Char=False')
    VendorLib = 'gds32.dll'
    Connected = True
  end
These values ensure that you are not dependent on the two .ini files when deploying the application to another machine - all required information is embedded.The only thing you need to ensure is that the dbExpress library (specified in LibraryName) is included, and that the DBMS driver (specified in VendorLib) is also available on the target machine.
dbExpress Components
Anyway, once you have configured the TSQLConnection component, you can use the other dbExpress components to retrieve data from the database tables and work with the data.All dbExpress components have a SQLConnection property that must be pointed to the TSQLConnection component, to connect them to the DBMS you're working with.
It should be obvious from their name what the purpose of the TSQLQuery, TSQLStoredProc, and TSQLTable components it.However, I seldom use them, since they are mainly available to assist in migrating from SQL Links applications that use TQuery, TStoredProc, and TTable (making it easier to use the dbExpress counterparts).
For new dbExpress applications, it's recommended to use the TSQLDataSet component, since it can actually act as Query, Table or Stored Procedure based on the value of its CommandType property (which can be ctQuery, ctStoredProc or ctTable).Based on the value of CommandType, the CommandText will be interpreted differently (as either an SQL command, the name of a stored procedure, or the name of a table).
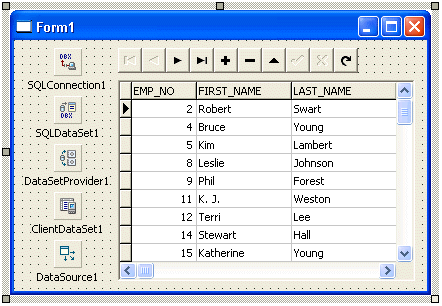
To continue our example, place a TSQLDataSet component on the form or data module, connect its SQLConnection property to the TSQLConnection component.By default the CommandType property will be set to ctQuery, so the CommandText property will accept an SQL query, like SELECT * FROM EMPLOYEE.
The TSQLDataSet (as well as TSQLQuery, TSQLStoredProc, and TSQLTable) will return a resultset that is unidirectional and read-only.This means that you can walk through the resultset using the Next method, but you cannot move back (using Prior), although you can go back to the First record again.Being read-only, it also means that you cannot make any changes to the data in the records of the resultset.This may be good enough for a situation where you only want to produce a list of selected records, but often you also want to allow the enduser to make some changes to the data as well.In cases where you want to allow more flexible navigation as well as read-write capabilities, you need to copy the resultset to an in-memory cache, called the TClientDataSet component.
But before you can put the data in the TClientDataSet, you first need to place a TDataSetProvider component on the form, with its DataSet property connected to the TSQLDataSet component.The TDataSetProvider is the "connector" between the TSQLDataSet on one hand, and the TClientDataSet on the other hand.After you've placed the TDataSetProvider, you can put a TClientDataSet next to it, and assign its ProviderName property to the name of the TDataSetProvider.
When you activate the TClientDataSet (by calling Open or setting its Active property to True), the TClientDataSet will request all records from the TDataSetProvider, which in turn will activate the TSQLDataSet and suck in all records from the resultset (once: from top to bottom).
A fifth component finishes the chain, and that's the TDataSource component connected with its DataSet property to the TClientDataSet component.Now you can place any data-aware component from the Data Controls category to display the records from the database tables, and work with the data.
ApplyUpdates
There is only one place where you need to write some code.In case you want to send the changes and modifications that were made back to the database table, you need to call the ApplyUpdates method of the TClientDataSet component.If you want to do this automatically, you can hook onto the OnAfterPost and OnAfterDelete event handlers of the TClientDataSet and call ApplyUpdates directly:
  procedure TForm1.ClientDataSet1AfterPost(DataSet: TDataSet);
  begin
    (DataSet as TClientDataSet).ApplyUpdates(0)
  end;

  procedure TForm1.ClientDataSet1AfterDelete(DataSet: TDataSet);
  begin
    (DataSet as TClientDataSet).ApplyUpdates(0)
  end;
The TSQLMonitor component can be used to monitor the communication between the TSQLConnection component and the actual dbExpress driver (in this case the dbexpint.dll driver).See the on-line help for more details.
WinForms & Web Forms
For a Windows Forms or Web Forms project (or more generally speaking: for any non-VCL for .NET target), we can use the ADO.NET providers that are available in the .NET Framework, or the Borland Data Provider that is specifically made for use with Borland C#Builder and Delphi 2005.The Borland Data Provider is not some exotic technology, but based on the ADO.NET architecture.The main differences are based on the fact that you only have one set of BDP components that can connect to many different databases (while with ADO.NET you need a different set of components for each database), and the fact that you can get live data at design-time (in both WinForms and Web Form applications).
Borland Data Provider for .NET
As an example, let's now build the same application that works with the InterBase Employee.gdb database, but this time as a Windows Forms application using the Borland Data Provider for .NET..
First, start a new Windows Forms application in Delphi 2005, save the form in WinForm.pas and the project itself in WinFormDBX.bdsproj.Note that you cannot use a data module with in WinForms projects, so we have to place the components on the main form itself this time.
Start with a BdpConnection component (from the Borland Data Provider category), and place it on the form.As you will notice, the BdpConnection component will not even be placed on the form itself, but rather in a special area of the WinForms Designer, were all non-visual components are placed.
The BdpConnection is the BDP-component that connects to the DBMS and is responsible for the communication between the DBMS and the other Borland Data Provider components.We must right-click on it to start the Connection Editor, which can be seen below.
The Borland Data Provider Connections Editor uses information found in two XML files, from the C:\Program Files\Borland\BDS\2.0\Bin directory, namely bdpDataSources.xml (for the list of BDP drivers) and bdpConnections.xml (with the connection settings).Changes that you make in the Connections Editor are also saved to the bdpConnections.xml file - but you can also modify them outside of the Delphi IDE (at your own risk, of course).Third-party drivers for the Borland Data Provider can be added to bdpDataSources.xml, just like third-party dbExpress drivers can be added to the dbxdrivers.ini file.
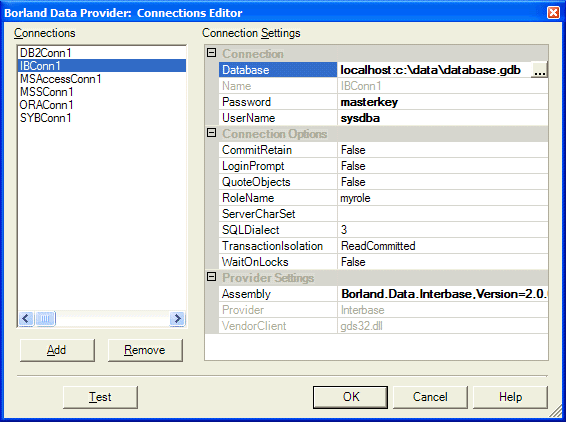
Again note the value of the Database property, which includes the IP-address (or machinename) as prefix to the fully qualified path of the database.You can click on the Test button to verify the connection.Note that the LoginPrompt property is set to False, so the Password and UserName should be correct.
After you close the BDP Connections Editor, the property values for the BdpConnection component are not saved in the .nfm file (Windows Forms applications do not use .nfm files), but can be found in the Windows Form Designer Generated Code section of your Windows Form.The specific code snippet is as follows:
  procedure TWinForm.InitializeComponent;
  begin
    Self.BdpConnection1 := Borland.Data.Provider.BdpConnection.Create;
    //
    // BdpConnection1
    //
    Self.BdpConnection1.ConnectionOptions :=
    'servercharset=;waitonlocks=False;transaction isolation=ReadCommitted;commitreta'+
    'in=False;sqldialect=3;loginprompt=False;rolename=myrole';
    Self.BdpConnection1.ConnectionString :=
    'database=localhost:c:\data\database.gdb;assembly=Borland.Data.InterBase,Vers'+
    'ion=2.0.0.0,Culture=neutral,PublicKeyToken=91d62ebb5b0d1b1b;vendorclient=gds'+
    '32.dll;provider=InterBase;username=sysdba;password=masterkey';
These values ensure that you are not dependent on the two XML files when deploying the application to another machine - all required information is embedded.The only thing you need to ensure is that the specific Borland Data Provider assembly Borland.Data.InterBase is included, as well as the generic (DBMS independent) Borland Data Provider assemblies Borland.Data.Common.dll, Borland.Data.Explorer.dll and Borland.Data.Provider.dll, and that the DBMS driver gdb32.dll (specified in vendorclient) is also available on the target machine.
Borland Data Provider Components
Once you have configured the BdpConnection component, you can use the other Borland Data Provider components to retrieve data from the database tables and place it in a native .NET DataSet in order to work with the data.You can use a BdpCommand component, or a more powerful BdpDataAdapter component (which has a BdpCommand for each of its four SelectCommand, InsertCommand, UpdateCommand, and DeleteCommand properties).
Using the BdpDataAdapter, place this component next to the BdpConnection component in the non-visual component area of the WinForm Designer.Then, right-click on the BdpDataAdapter and select "Configure Data Adapter" to start the Data Adapter Configuration dialog, shown below.
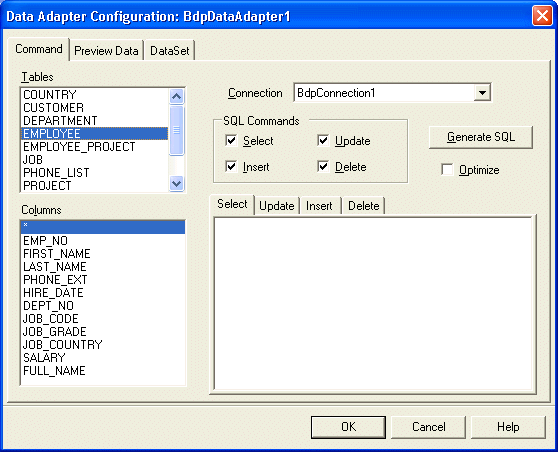
In the Borland Data Provider Data Adapter Configuration dialog, we can specify the four SQL commands that are used for the SelectCommand, UpdateCommand, InsertCommand and DeleteCommand properties (assigned with instances of BdpCommand components).As you can see in the above screenshot, you can select from the tables and for each table from the list of available fields.If you do not want to use all four SQL commands, then you can uncheck their options and click on the "Generate SQL" button to regenerate the SQL for the remaining commands.
Note the Optimize checkbox, which can be used to generate slightly optimized SQL statements for the Update and Delete command, passing only the primary key (index) field in the WHERE clause, instead of all fields.This is slightly faster, but also a bit more dangerous, since it could lead to Update or Delete commands where you do not verify if the record has been changed by another user (ADO.NET and the Borland Data Provider are using a so-called disconnected model, so the snapshot of the data in the local DataSet may not be the exact representation of the data in the remote DBMS itself - someone may have changed records and fields since you last retrieved them to your local machine).Personally, I would only use the Optimize option if I knew for certain that there would be only one person to make changes or modifications to the database.Otherwise, I would not enable the Optimize option to avoid problems.
After you've specified the SQL commands for the BdpDataAdapter component in the Data Adapter Configuration dialog, you can go to the second tab and get a preview of the results from the SQL SELECT statement.And you can go to the last tab to specify where the resulting DataTable should be put - for example in a new or existing .NET DataSet (by default a new .NET DataSet called dataSet1 will be created for you, which will also be placed in the non-visual components area of the WinForms Designer).
When you close the dialog, you can activate the SELECT command by setting the Active property of the BdpDataAdapter component to True.This will produce the result of the SQL SELECT command, and place it inside the specified .NET DataSet.
You can then use this DataTable from the .NET DataSet to show live data at design-time.Just place a DataGrid component on the Windows Form, and assign its DataSource property to the DataSet component.and its DataMember property to the name of the DataTable (by default the name of the table where the SQL SELECT command operates on, like EMPLOYEE).The result is live data at design-time, as we have been used to have since the very first version of Delphi.
AutoUpdate
Again, there is only one place where you need to write some code.In case you want to send the changes and modifications that were made back to the database table, you need to call the AutoUpdate method of the BdpDataAdapter component.You can place a button and call AutoUpdate in its Click event as follows:
  procedure TWinForm.btnUpdate_Click(sender: System.Object; e: System.EventArgs);
  begin
    BdpDataAdapter1.AutoUpdate(dataSet1, 'EMPLOYEE', BdpUpdateMode.All)
  end;
This will send the changes from the DataTable called EMPLOYEE, located in the .NET DataSet called DataSet1, to the InterBase database.Similar to the technique used with the dbExpress components.
Delphi 2005 and Data Migration
C#Builder and Delphi 8 introduced the Data Explorer (also sometimes called Database Explorer - and it might have been called Borland Database Explorer - if we didn't already have a use for the BDE acronym).
In Delphi 2005, the Database Explorer has been enhanced with table copy and data migration capabilities, among others.
The Database Explorer is available either as stand-alone version, or embedded in the Delphi 2005 IDE (where you can usually find it in the upper-right corner, in the area shared with the Project Manager and Model View).
When you start the Database Explorer of Delphi 2005, you might see that it now supports a new provider type, for Sybase.
This brings the list of certified BDP data provider drivers to the following: Borland InterBase 7.5 (should also work but is not certified with InterBase 7.1, 7.0 and 6.5), Oracle 10g (should also work with Oracle 9.2.0 and 9.1.0), IBM DB2 UDB 8.x (should also work with 7.x), Microsoft SQL Server 2000, Microsoft MSDE 2000, Microsoft Access 2000, and Sybase 12.5.
If you want to migrate data from one of these databases to another, then you can use the Database Explorer to do this for you.
Right-click on one of the Providers, and select "Migrate Data".
This will present you with the Data Migration window (either in the centre of the Delphi 2005 IDE, or in the right pane of the Database Explorer itself).
Here, you can select two providers: a source and a destination provider.
In theory, you'd say that these providers do not have to be different (you could simple want to copy an InterBase table to another table in the same database), but the problem is that you cannot change the tablename.
If you simply want to copy a table - to another name - in the same database, then there are other means (I'll show you in a minute).
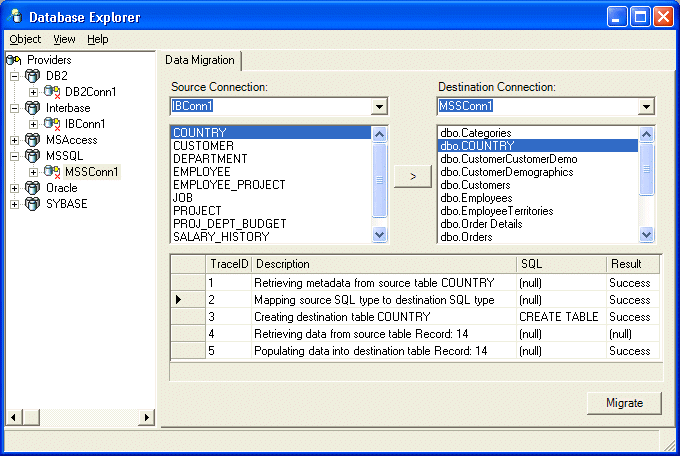
Right now, let's select assume we have an InterBase connection pointing to the Employee.gdb example database (as source provider), as well as a SQL Server connection pointing to the Northwind example database (as destination provider).
If we want to migrate the COUNTRY table from the InterBase database to the SQL Server database, then we only have to select the COUNTRY table, and click on the > button to indicate that we want to create a new table in the SQL Server database, with the dbo.Country name, and the data from the InterBase COUNTRY table.
A click on the actual "Migrate" button (at the lower-right corner of the screen) will attempt to analyse the source table, create the new table (with the same fields and types), copy the data from the source table, and insert the data into the destination table.
For each step, a progress and result is shown in the Data Migration window, as shown below (after the successful migration):
In case you're interested, the SQL for the CREATE TABLE statement is as follows:
  CREATE TABLE COUNTRY (
    COUNTRY VARCHAR(15)  NOT NULL ,
    CURRENCY VARCHAR(10)  NOT NULL ,
    PRIMARY KEY  ( COUNTRY )
  )
Copy Table
The Data Migration page is quite powerful, although it doesn't allow me to copy a certain table to the same connection, specifying a new table name (i.e. making a backup of a table inside the same database, for whatever purpose).
A feature that is very similar to the data migration functionality, is called the Copy Table approach.
This time, we have to open up a Provider and Connection node, and right-click on a Table to select the "Copy Table" menu choice.
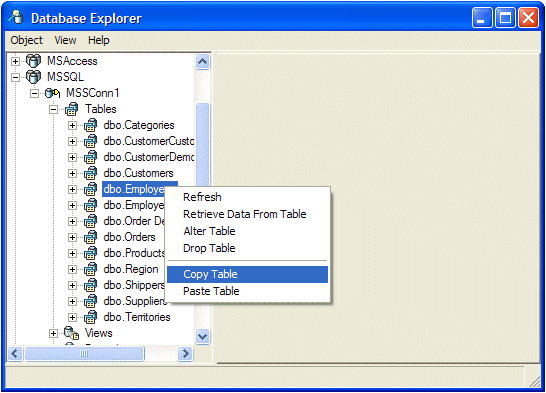
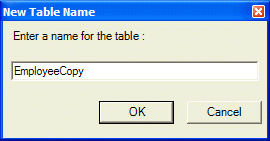
When you want to Paste the same table (using Paste Table), you first get a dialog where you can enter the new name of the copy of the table. Here we can specify EmployeeCopy for example:
After you've copied a table, you may need to refresh the list of Tables to see the new table. If you want to remove the copy of the table again, you can use Drop Table. And finally, note the Alter Table which gives you the ability to change the table, adding, moving of changing fields and fieldtypes.
BdpCopyTable
There's one thing I want to end this column with: the source code equivalent of the copy table and data migration ability of the Database Explorer.
For this functionality, we can use one of the new BDP (Borland Data Provider) components, namely the BdpCopyTable component.
Start a new Delphi 2005 WinForms project, and drop a BdpCopyTable component on the form.
It's a non-visual component, so will be placed in the non-visual components area of the WinForms Designer.
It has a number of properties that we need to set before we can use it, namely SourceCommand, Destination and DestinationTable.
First of all, the SourceCommand property should be pointing to the SelectCommand of a BdpDataAdapter.
To get one, first open one of the Provider nodes in the Data Explorer, and drag a connection (for example the one to the SQL Server Northwind database) to the WinForm.
This will place a BdpConnection component on the WinForm.
Next, place a BdpCommand component from the Borland Data Provider category on the WinForm.
Assign its Connection property to the BdpConnection component.
Set the CommandType property to TableDirect, and select a TableName as value for the CommandText property, for example dbo.Employees.
Now, click on the BdpCopyTable component, and point its SourceCommand property to the BdpCommand component.
Once this is done, we can concentrate on the Destination property, which needs to point to a BdpConnection component (either the same one, or a different one), and finally the DestinationTable property, which specifies the name of the Table in the destination database.
If I point the Destination property to the same BdpConnection that points to the Northwind database, and specify EmployeeCopy as DestinationTable property value, then we only have to call the Copy method to do the actual copying.
  procedure TWinForm.TWinForm_Load(sender: System.Object; e: System.EventArgs);
  begin
    BdpConnection1.Open;
    try
      BdpCopyTable1.Copy;
    finally
      BdpConnection1.Close;
    end;
  end;
Again note that the BdpCopyTable can be used to copy tables within the same provider, or from one provider to another (i.e. migrating data).
Very powerful indeed.
Summary
In this article I've described and demonstrated the database access technologies that are available for Delphi 2005 developers, as well as the data migration capabilities of the Data Explorer (and BdpCopyTable component).For each of the techniques, we have seen how it works, and which databases can be accessed through it.
When using dbExpress, we can build a chain from TSQLConnection, TSQLDataSet, TDataSetProvider to the TClientDataSet and work with the data, calling the ApplyUpdates method from the TClientDataSet to send the updates back to the database.When using Borland Data Provider, we can use a BdpConnection, BdpDataAdapter (that uses one or more BdpCommand components) to put the DataTable in a .NET DataSet, calling AutoUpdate from the BdpDataAdapter to send updates back to the database.
Whether you want to build WinForms, Web Forms or VCL for .NET applications, Delphi 2005 has the data access technology available to connect to and work with the mayor players in the field like SQL Server, DB2, Oracle, Sybase, InterBase and many others.